


Popcorn Ceiling
After confirming that the popcorn ceiling doesn't contain asbestos (mail-in DIY kit), I set to spraying and scraping down the ceiling. I used big plastic sheets to funnel all the droppings into a garbage bag, which minimized the amount of nasty cleanup.


Kitchen Demolition and Appliances
Cutting out the wall separating the dining room from the kitchen gives the refrigerator door to open. With the wall gone, the light switch needed to move to a different wall.


The vent from the previous microwave recirculated air back into the kitchen. I wanted the new microwave to vent out into the carport, so I needed to cut another hole in the house. Someday I'll repair the siding so it looks nicer, but for now, it'll keep the bugs out.


Connected... love the apps!


Tribute to a 27-Year Old Fridge
This fridge came with the house, and chugged along for much longer than should be expected. My appraiser described it as ‘serviceable’, which seems to be the politically correct way to point out that it works but probably will require TLC to keep it working.
It must have sensed that the new appliances would be arriving the very next day, and decided to crap out. Let it be known that I got every last minute of useful life out of this thing. RIP, my old fridge.

You kept my food cold, sort of
Lack of storage helped me diet
Missing kick plate showed your workings
None accuse you of being quiet
Broken shelves empty by gravity
Delayed ice rinsed my flooring
Rotten produce feeds my compost
Energy efficiency is so boring
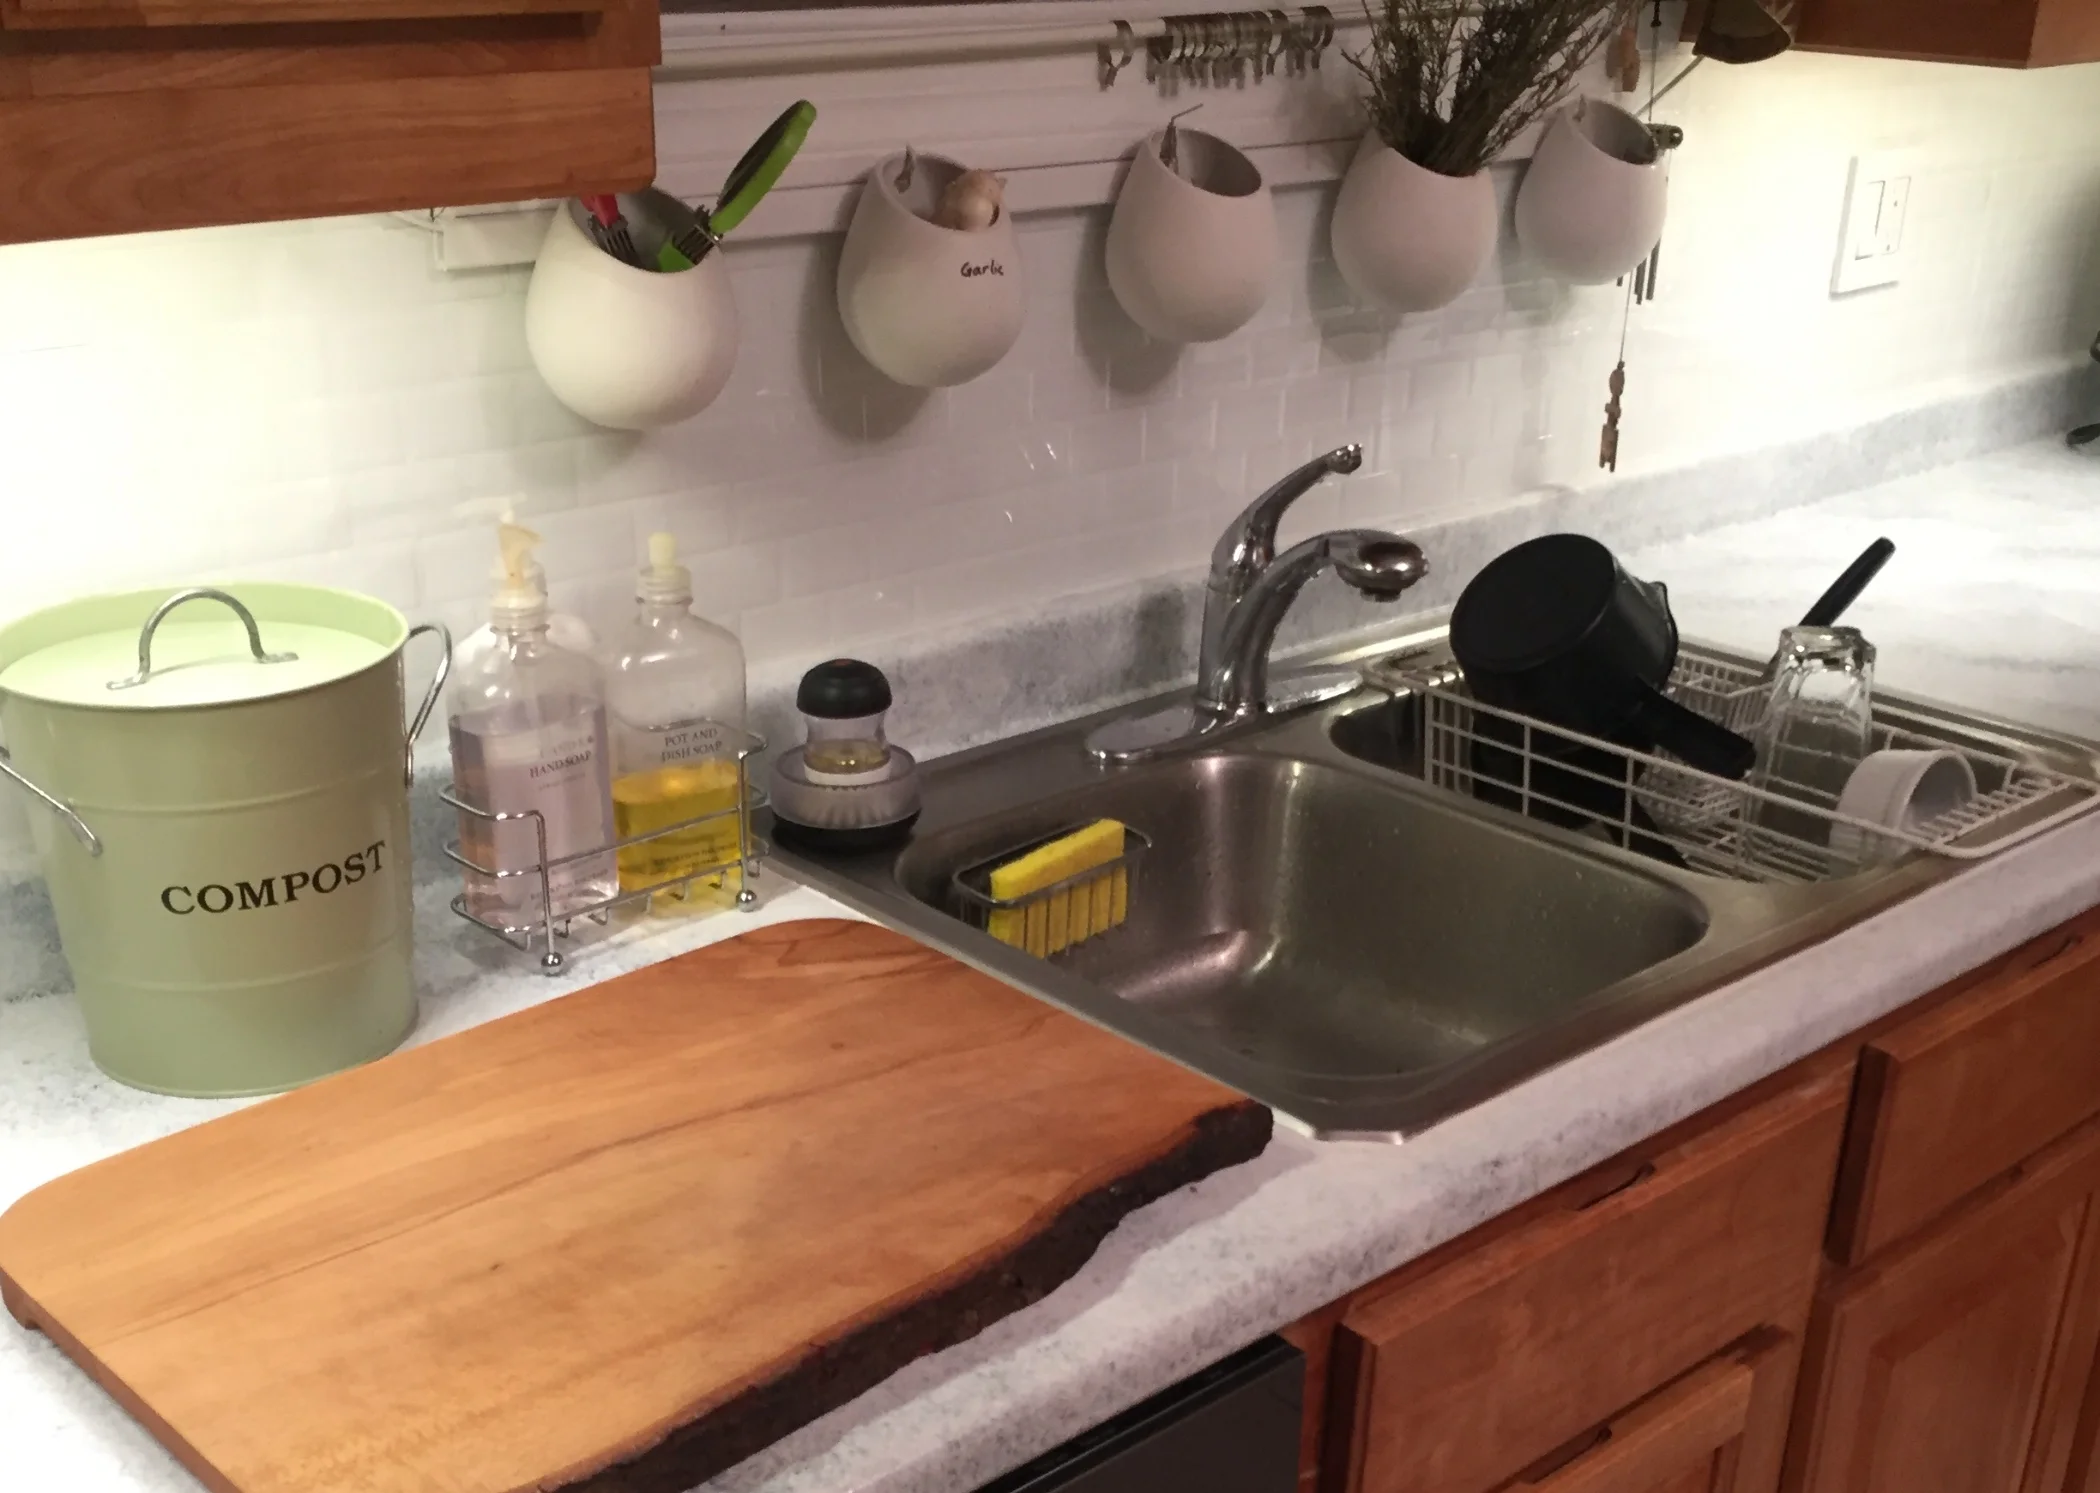
Kitchen Colors
Painted counter and peel-and-stick backsplash gives short-term brightness to my previously dull kitchen.
Before
The tan/bisque/yellow color palate was dreary and screaming out for an update. I want to fix the door-adjacent-stove problem before I invest in gorgeous stone countertops, new sink, and real tile. So, this gives me a pick-me-up for now. It's a $300 fix to a $5000 problem.
One of the countertop seams had started to lift... and it was getting worse. So I started to poke at it, and I made it a lot worse. I figured, I hate the crappy beige plastic counters... what do I have to lose? I started by peeling back the plastic and chiseling out the rotted wet sawdust.
Now what? Ah, good old-fashioned Bondo. The first layer goes in thin, to keep the crumbs down like when you're frosting a cake. I continued with a thicker, smooth layer. And then sanding. I have to admit, I got lazy here, and if you know where to run your hand across the finished counter, you can still feel the lump. (And if you call me out on it, no treats for you.)

Now the fun part... paint!
Product: Giani Granite White Diamond
They call it a three-step process, but it's actually more like five:
Step 1: Roll on flat black primer
Step 2a: Sponge on 'Pearl Mica'
Step 2b: Sponge on 'Inca Gold'
Step 2c: Sponge on 'Limestone White' (twice)
Step 3: Roll on glossy top coat
Next: peel-and-stick backsplash. Product: Tic Tac Tiles, in Subway White.


After
After adding under-cabinet lighting and caulk, the kitchen feels brighter and cleaner.
Products:
LED Concepts Linkable LED Light Bars attach to the under-side of the cabinet.
Two Lutron remote-controlled dimmer plugs allow me to control lights on both sides of the kitchen (plugged into two different outlets) using a single switch.
Lutron double-gang wall plate fastened directly to the drywall holds two remotes - one for the under cabinet lights, and one for the over-the-sink light.

Ramp for Sadie
Repurposing hand-me-down constructs from the neighbors to help my Sadie manage stairs.
She doesn't necessarily need it right now, but I love re-purposing leftovers. As my girls get older and more arthritic, this will allow them to bypass the stairs.

Movie Night
New fun way to enjoy the yard... neighborhood outdoor movie night!
Neighborhood movie night! We rolled out the projector and screen, and lit the bonfire for making s'mores and popcorn that rises in an expanding aluminum foil bubble. The grown-ups hung back by the table (and, more importantly, beer cooler) while the kids stared wide-eyed at the screen and recited the lines to Despicable Me. What a great night!


Front Walk Garden
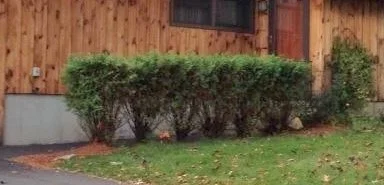
The arborvitae hedges smelled nice, but had grown beyond an attractive shape. I initially tried to prune them back, hoping the woody lower half would fill in. It didn't. So out they went.


Finally I decided that I didn’t really want a row of matching, unappealing hedges. I picked new plantings that will hopefully give the area more interest all year long.
- Dwarf Alberta spruce
- Oenothera 'Siskiyou Pink'
- Salvia
- Missouri Primrose
- Spirea
- Butterfly bush
- Hydrangea


Update December 2016: My little spruce is adorable dressed up for Christmas.
Update Summer 2017: a few plants didn’t survive the winter, but for the most part, my plants are thriving. I love the variety of heights and textures and colors and flowers. The scent of flowers and a flutter of butterflies greets me every time I walk out the door.

Patio
Backyard patio flanked by gardens for entertaining, lounging, and growing.
Before
A narrow walk of sunken pavers connected the back door and screen room stairs, and then trailed off into the yard. The two bushes had outgrown the attractive size, blocking the windows and leaving black splotches on the outside of the house.

During

After
I love stepping out of the basement French doors onto my patio.


Terraced Vegetable Garden
Screen room gone, and replaced with a terraced vegetable garden built with rocks.
When the screen room came down, the scarred footprint was a nasty mix of litter, construction debris, and sand. First I cleaned the garbage and dug out the top foot of dead soil to roughly outline the steps.


Next I used local rocks (boulders, technically) to build steps. This is the granite state, after all... and I had lots of neighbors willing to contribute their rock piles. I experimented with shapes... fitting rocks together and carving into the slope. I didn't want a symmetrical staircase... I wanted something a little more natural feeling.


The sand is so loose that I used plywood pieces to hold back the steps... I'll need to find a more permanent solution, but this works for now. I also learned in the first heavy rain that the sand easily poured through the gaps between the rocks, leaving little deltas on the next level down. Learning from my neighbor Michele's garden success, I tore apart what I had already built, dug a ditch behind each rock wall and sunk a double layer of heavy plastic sheeting to keep the soil where I wanted it.

That's as far as I got in the summer of 2016, which is just as well, since I wasn't about to plant new vegetables in August. My boulder-hoisting continued in spring 2017:


Once I got the step the way I wanted it, I filled each bed with manure-rich organic garden soil and started planting. Happy garden!


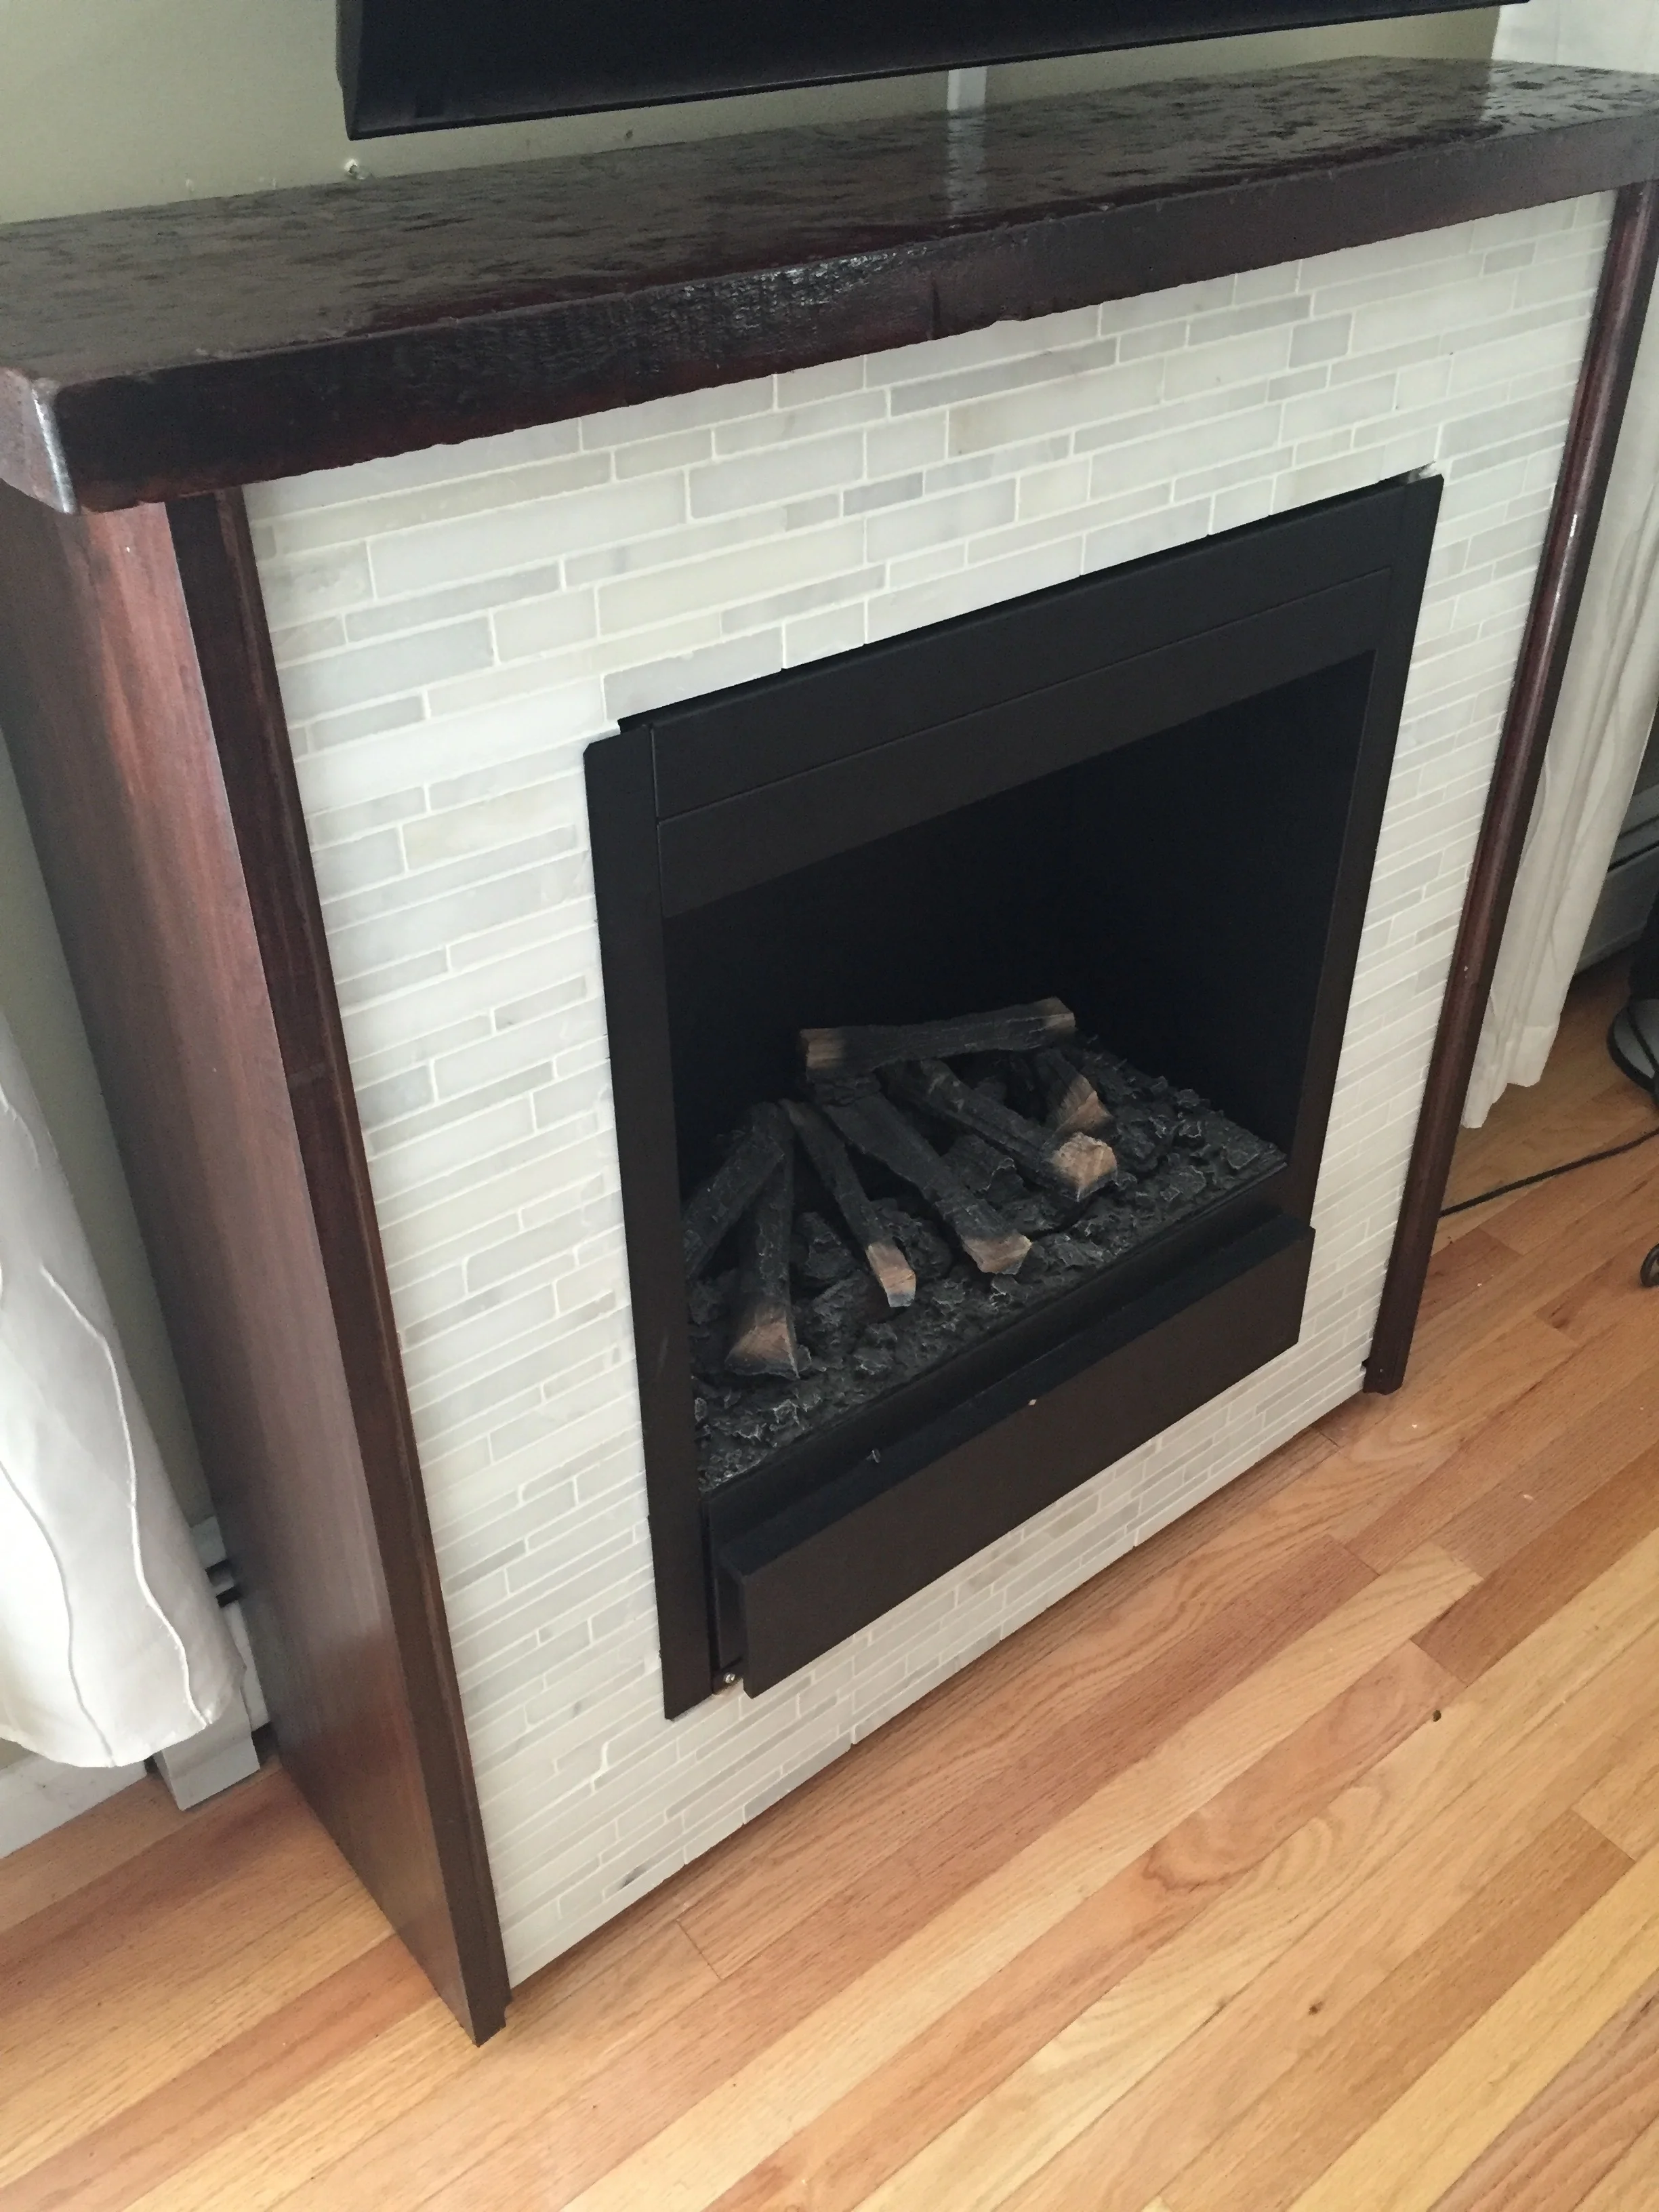
Fireplace Surround
Tile surround for the electric fireplace insert.
I found a really cool cold-steam electric fireplace on good a clearance discount, so I bought it before I really figured out what to do with it. It sat frameless in my bedroom for a few years until I set to work building a surround for it. Measurements that I carried in my phone's MyMeasures app for longer than I care to admit.

Measurements that I carried in my phone's MyMeasures app for longer than I care to admit.

I built a box out of pine 1 x 12 boards, and added a layer of cement backerboard over the front. Then I got see how well my YouTube education on laying tile would serve me.


My friend Linda had given me a fantastic thick old wooden plank that had served for decades (centuries?) as a bar top in Boston. I love to run my fingers across the dented surface and imagine all the pint glasses that clattered down over the years from hands heavy with beer.

Rain Barrel
My hand-me-down rain barrel now collects rain from two segments of gutters, and sends overflow through tubes buried in the garden. At least... that's how it works when it's not overflowing from summer deluges.


Michele's Garden
Michele's garden gives me inspiration
Over the last few decades, Michele two doors up has cultivated an extensive collection of perennials that thrive and multiply... and I'm happy to help when she thins them out.

Climbing hydrangea entwined with buoys from Bill & Michele's sailboat adventures.

Sedums climb the rock wall up to a lush bed of lilies, irises, ferns, dashes, hostas, and other perennials that I have yet to catalog.
New Roof
A big project.
I knew that the roof had some issues when I bought the house. Some were easy to see from the ground, others were pointed out by my inspector. The sheathing was too thin for the 24" span of the rafters, and in some places it wasn't nailed to the rafter at all, allowing for a sagging appearance and obvious squish when stepped on. Inside, the heat damage illustrated the poor ventilation.


So... quotes. And more quotes. Each one higher than the last... except for the one guy in a pickup truck who sent his teenager onto my roof (without appointment or permission) while I was in the middle of a conference call. He was the cheapest. And I didn't hire him.
I learned all about soffit vents and ridge vents and underlayment and more than I care to know about roofs. What I do know is that I have 6 feet of crazy thick coating around all the edges of my house to prevent ice dams from leaking through, and then other self-healing awesomeness over the whole house, and a ridge vent that's extra puffy, and a 50 year warranty. Yep, five-zero. 50.


New roof! I painted the shed door and trim to demonstrate the new color scheme... but I still need to get the eaves of the house painted.


Painted Wall
Ugly retaining wall turned gorgeous mural.
My mother, the very talented Mrs. Pineo of the mural-painted Hadley Elementary School, offered to paint my ugly retaining wall. She painted it without my help... in fact, she was dog sitting while I was sunning myself at Virginia Beach.
So now my formerly ugly eyesore of a retaining wall is a lovely mural that blends in with the landscaping... and soon... patio!
Before

After

Fence Edging
No. Weedwhacking. EVER.
I edged the grassy fence line with mulch to avoid having to weed-whack and make mowing easier. I also dug a corner garden so I don't need to fight to get the lawn mower in there.


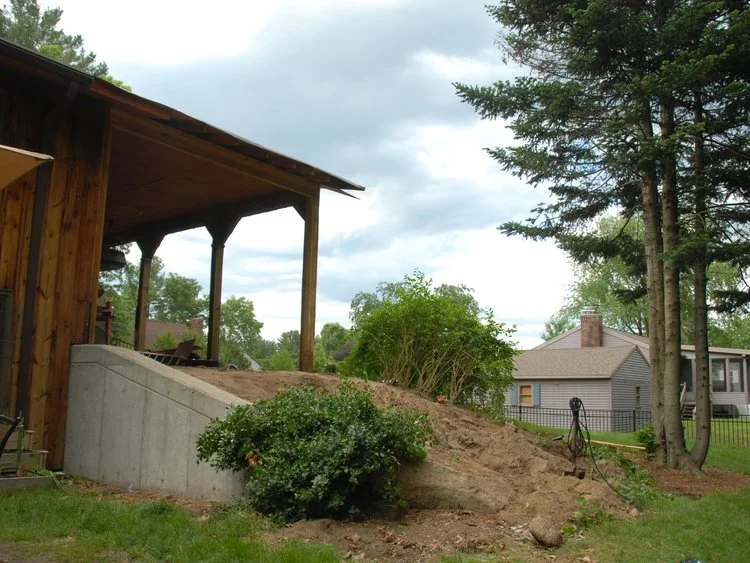
Screen Room Demolition
Time for a major change... no more looking out the living room window at the screen room.
When I bought the house, I couldn't figure out how best to use the screen room. It was disconnected from the house, and hovering above the yard... this was a great concept that was badly executed. It became storage. Storage with a rotting floor, shaky stairs, torn screens, and squishy roof. What a mess. I was getting the house re-roofed, so I needed to cut bait.
This was not a job for one. Especially not this one. I hired a local gentleman who does home rejuvenation projects, and occasionally hires the son of my neighbor. Two short days later, the room was gone, and I was left with a sandy slope. (See my Terraced Vegetable Garden for how it turned out.)

I appreciate bug protection, but I want to entertain in the yard, not above it.

The screen room is a collector for pollen and dead bugs.

Crud underneath.

Roof mush needed a spatula moreso than a crow bar.

Ready for haul-away
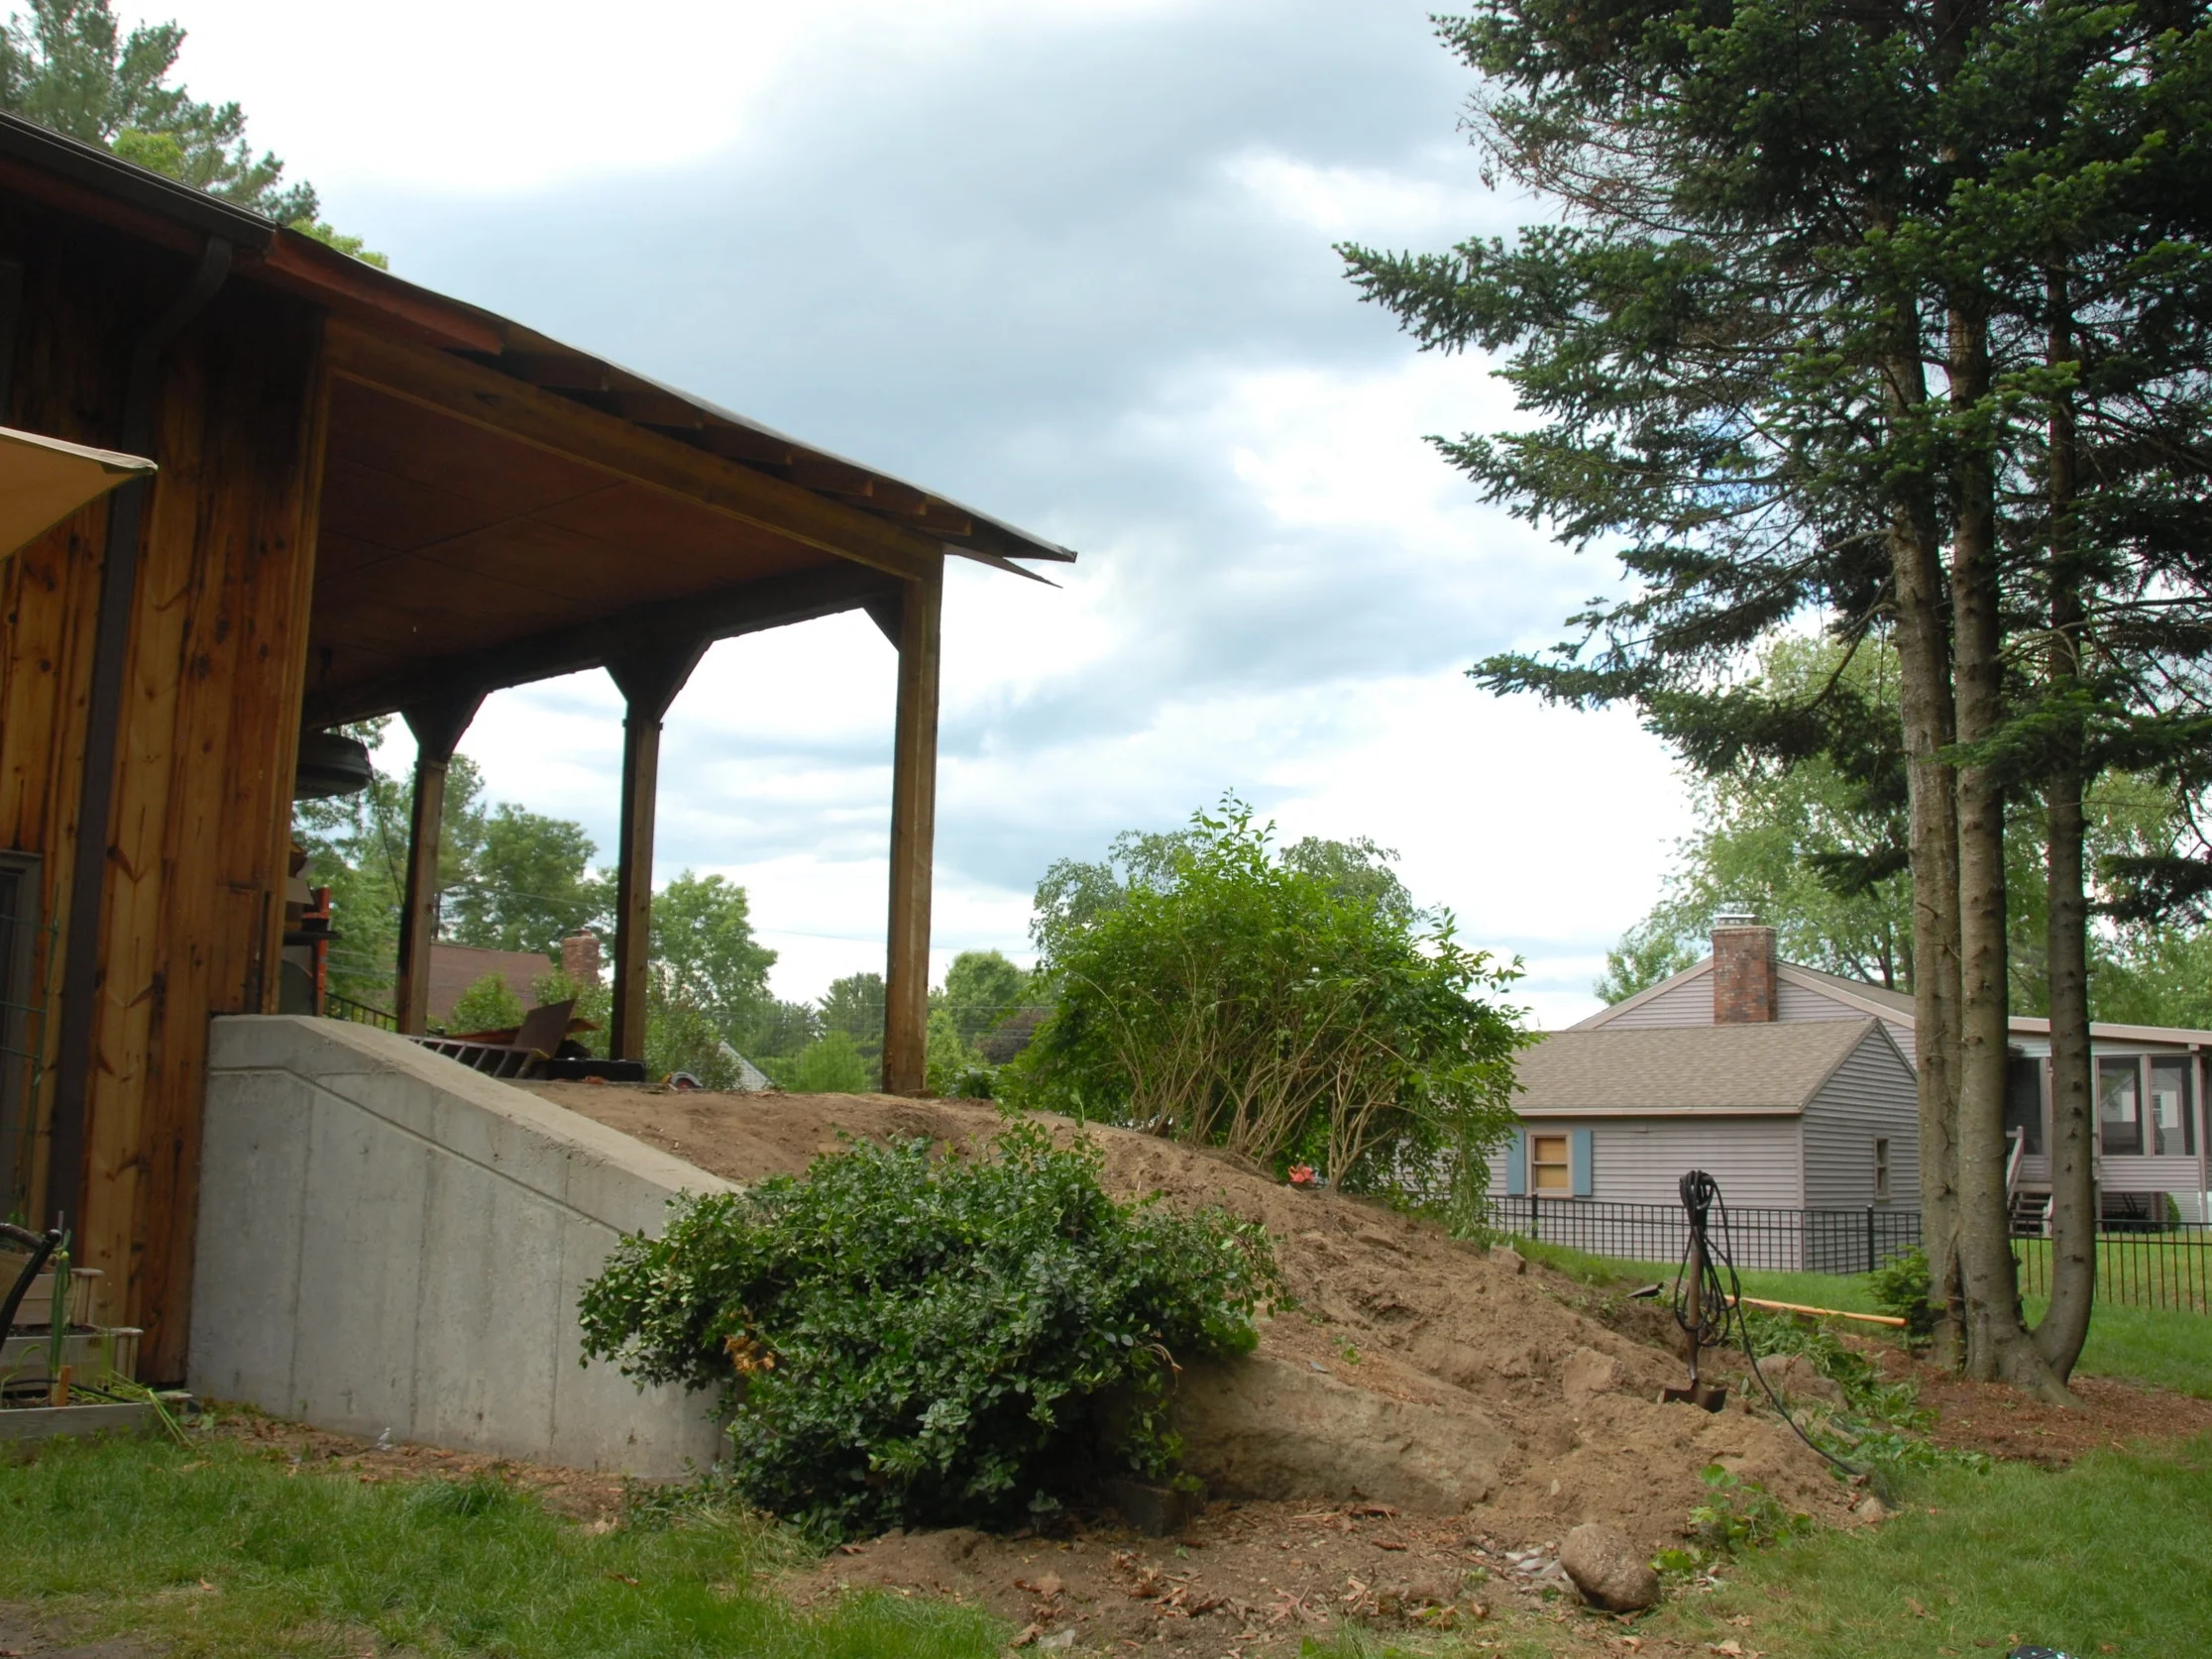
The sandy slope beneath filled with debris.

Much nicer.

Upcycle: Potting Bench
I created a storage and planting bench out of found materials.
I had some scraps hanging around, so I built a (temporary) potting bench to house all my gardening gear.


Storage Closet Organization
Labeled bins make stuff easy to find and retrieve.
I can't stand big plastic storage bins that grow in heft until they can't easily be lifted. Even worse is when they get stacked up so you need to move four awkwardly heavy bins in order to get at the contents of the fifth.
Sterilite makes a shelf-and-bin system that solves this issue... 25-quart and 50-quart bins. I like that they stack tightly, efficiently using all available space.
