
Pond Installation
The Concept
Summer 2019
I love the idea of a backyard plunge pool where my fur babies and I can go for a dunk on a hot day. But since New Hampshire doesn’t have a majority of hot days, it seems silly to install a pool. So… why not a water feature I can enjoy most months, even when it’s too cold to swim? I’d like the water surface to be maybe 10’ x 15’, 3-4 feet deep… enough for dogs to plunge, and for me and a friend to relax with a couple of tropical beverages. And it won’t look like a tarp-covered hippopotamus all winter long.
Other requirements:
Most important: sloped egress for the dogs… drowning hazards are no joke.
Integrated landscaping… I know it might not look like nature put it there, but it should look like it fits in.
No loose sand/mud for wet dogs to track in the house.
Waterfall for soothing white noise.
Low-ish maintenance. I can handle skimmers, chemicals, and seasonal maintenance… but nothing that I have to keep alive (e.g. fish).
Maybe: ambient lighting?
Now I’m really starting to collect ideas. And searching through online tutorials figuring out how much of a pain in the butt this is going to be.
THE CANVAS
Spring 2020, A.K.A: “Before”


Ideas
I’m envisioning the pond and waterfall built into the existing slope. The ferns are in the back corner of the lot. I’m sure the fir tree will be in the way… that can easily be removed. Actually, any of the plantings in this corner can be yanked out… the bushes obscure some boulders that stabilize the corner. There is an irrigation line that I’ll have to deal with.


Instructional* Videos
* Not to be confused with thinking I can do this alone.
VISIT TO THE POND SHOP
July 2020
Maddox and I headed out to Chester Hollow Water Garden for a socially-distanced tour of the fountain-studded grounds.


Making it Happen
July 2021
It’s been SO HARD to wait, especially through the heat waves New England has already experienced. But the time has come: I’m getting a pond. Correction: Maddox is getting a pond. 💖
Charlie from Chester Hollow Water Gardens visited my property to get an idea of what I want, and to formulate a design. We walked and talked and pointed and I tried to envision what he will build for me, but I probably won’t be certain until it’s actually in place. Of this I am certain: it’s going to be gorgeous.
Maybe something like this? Except better.
Pond Equipment
Here are the highlights of what went into my pond construction, all by AquaScape.


digging and Building
Click open each picture to see it full-size and read descriptions.


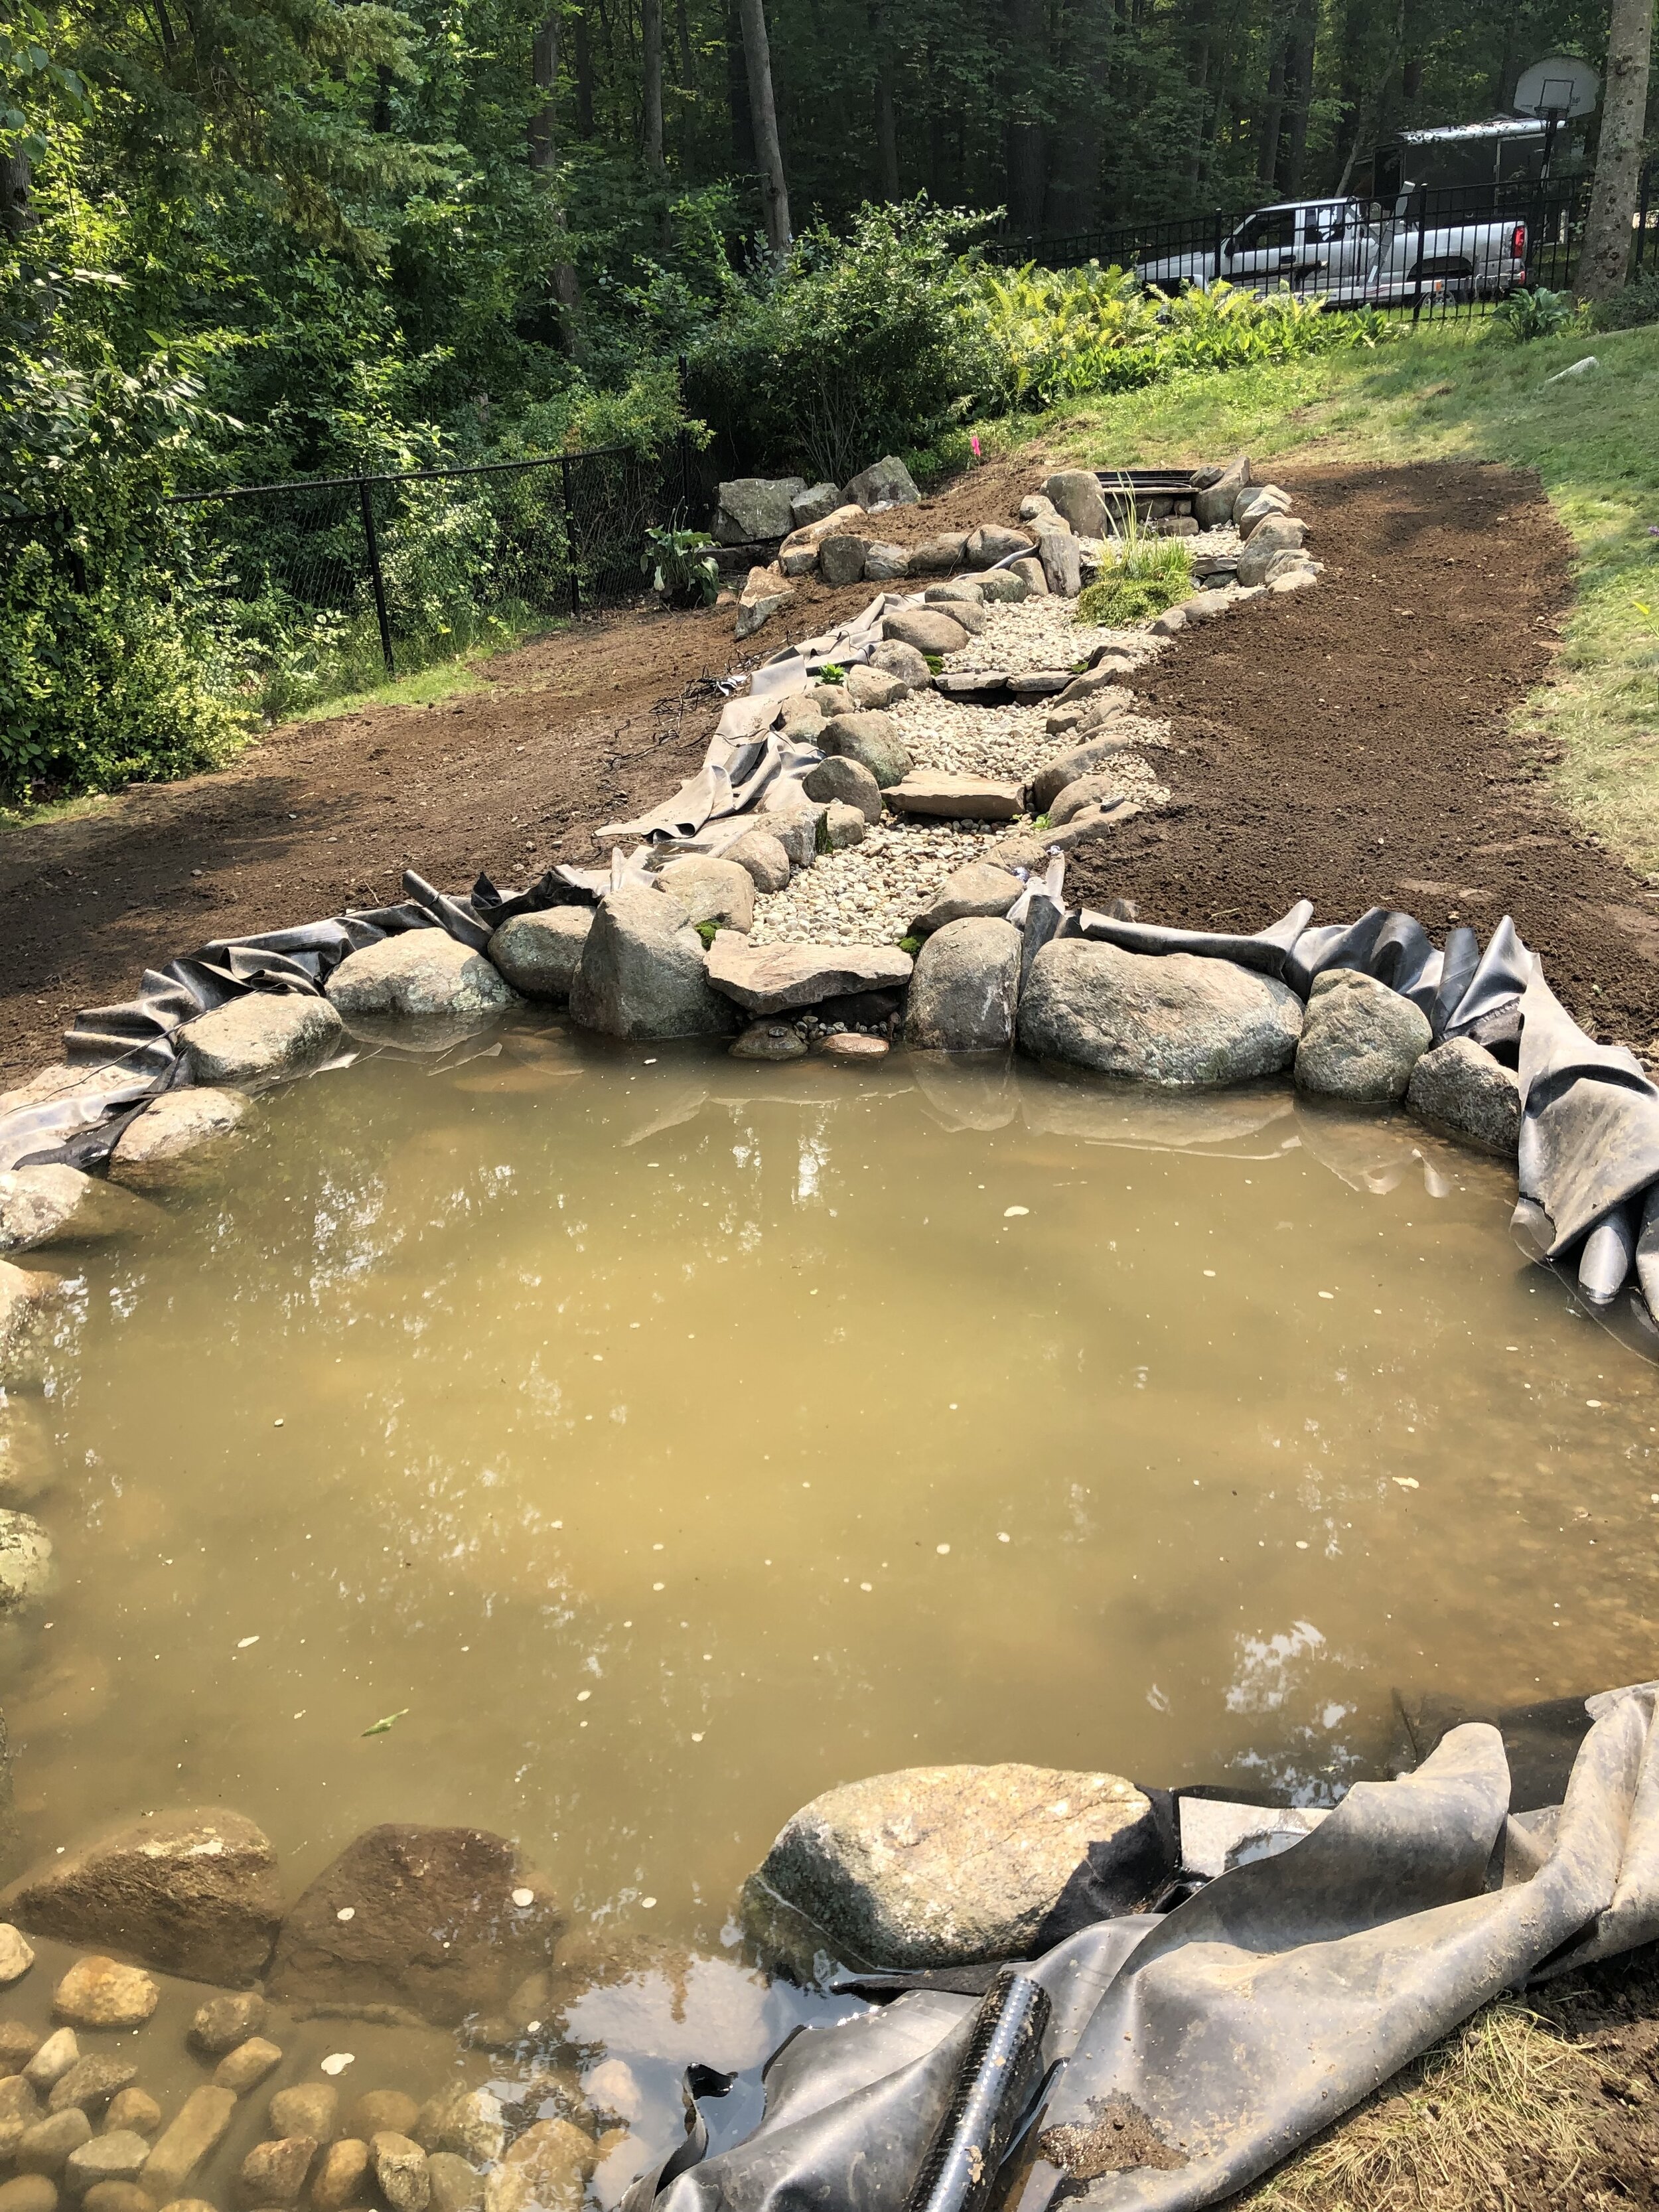


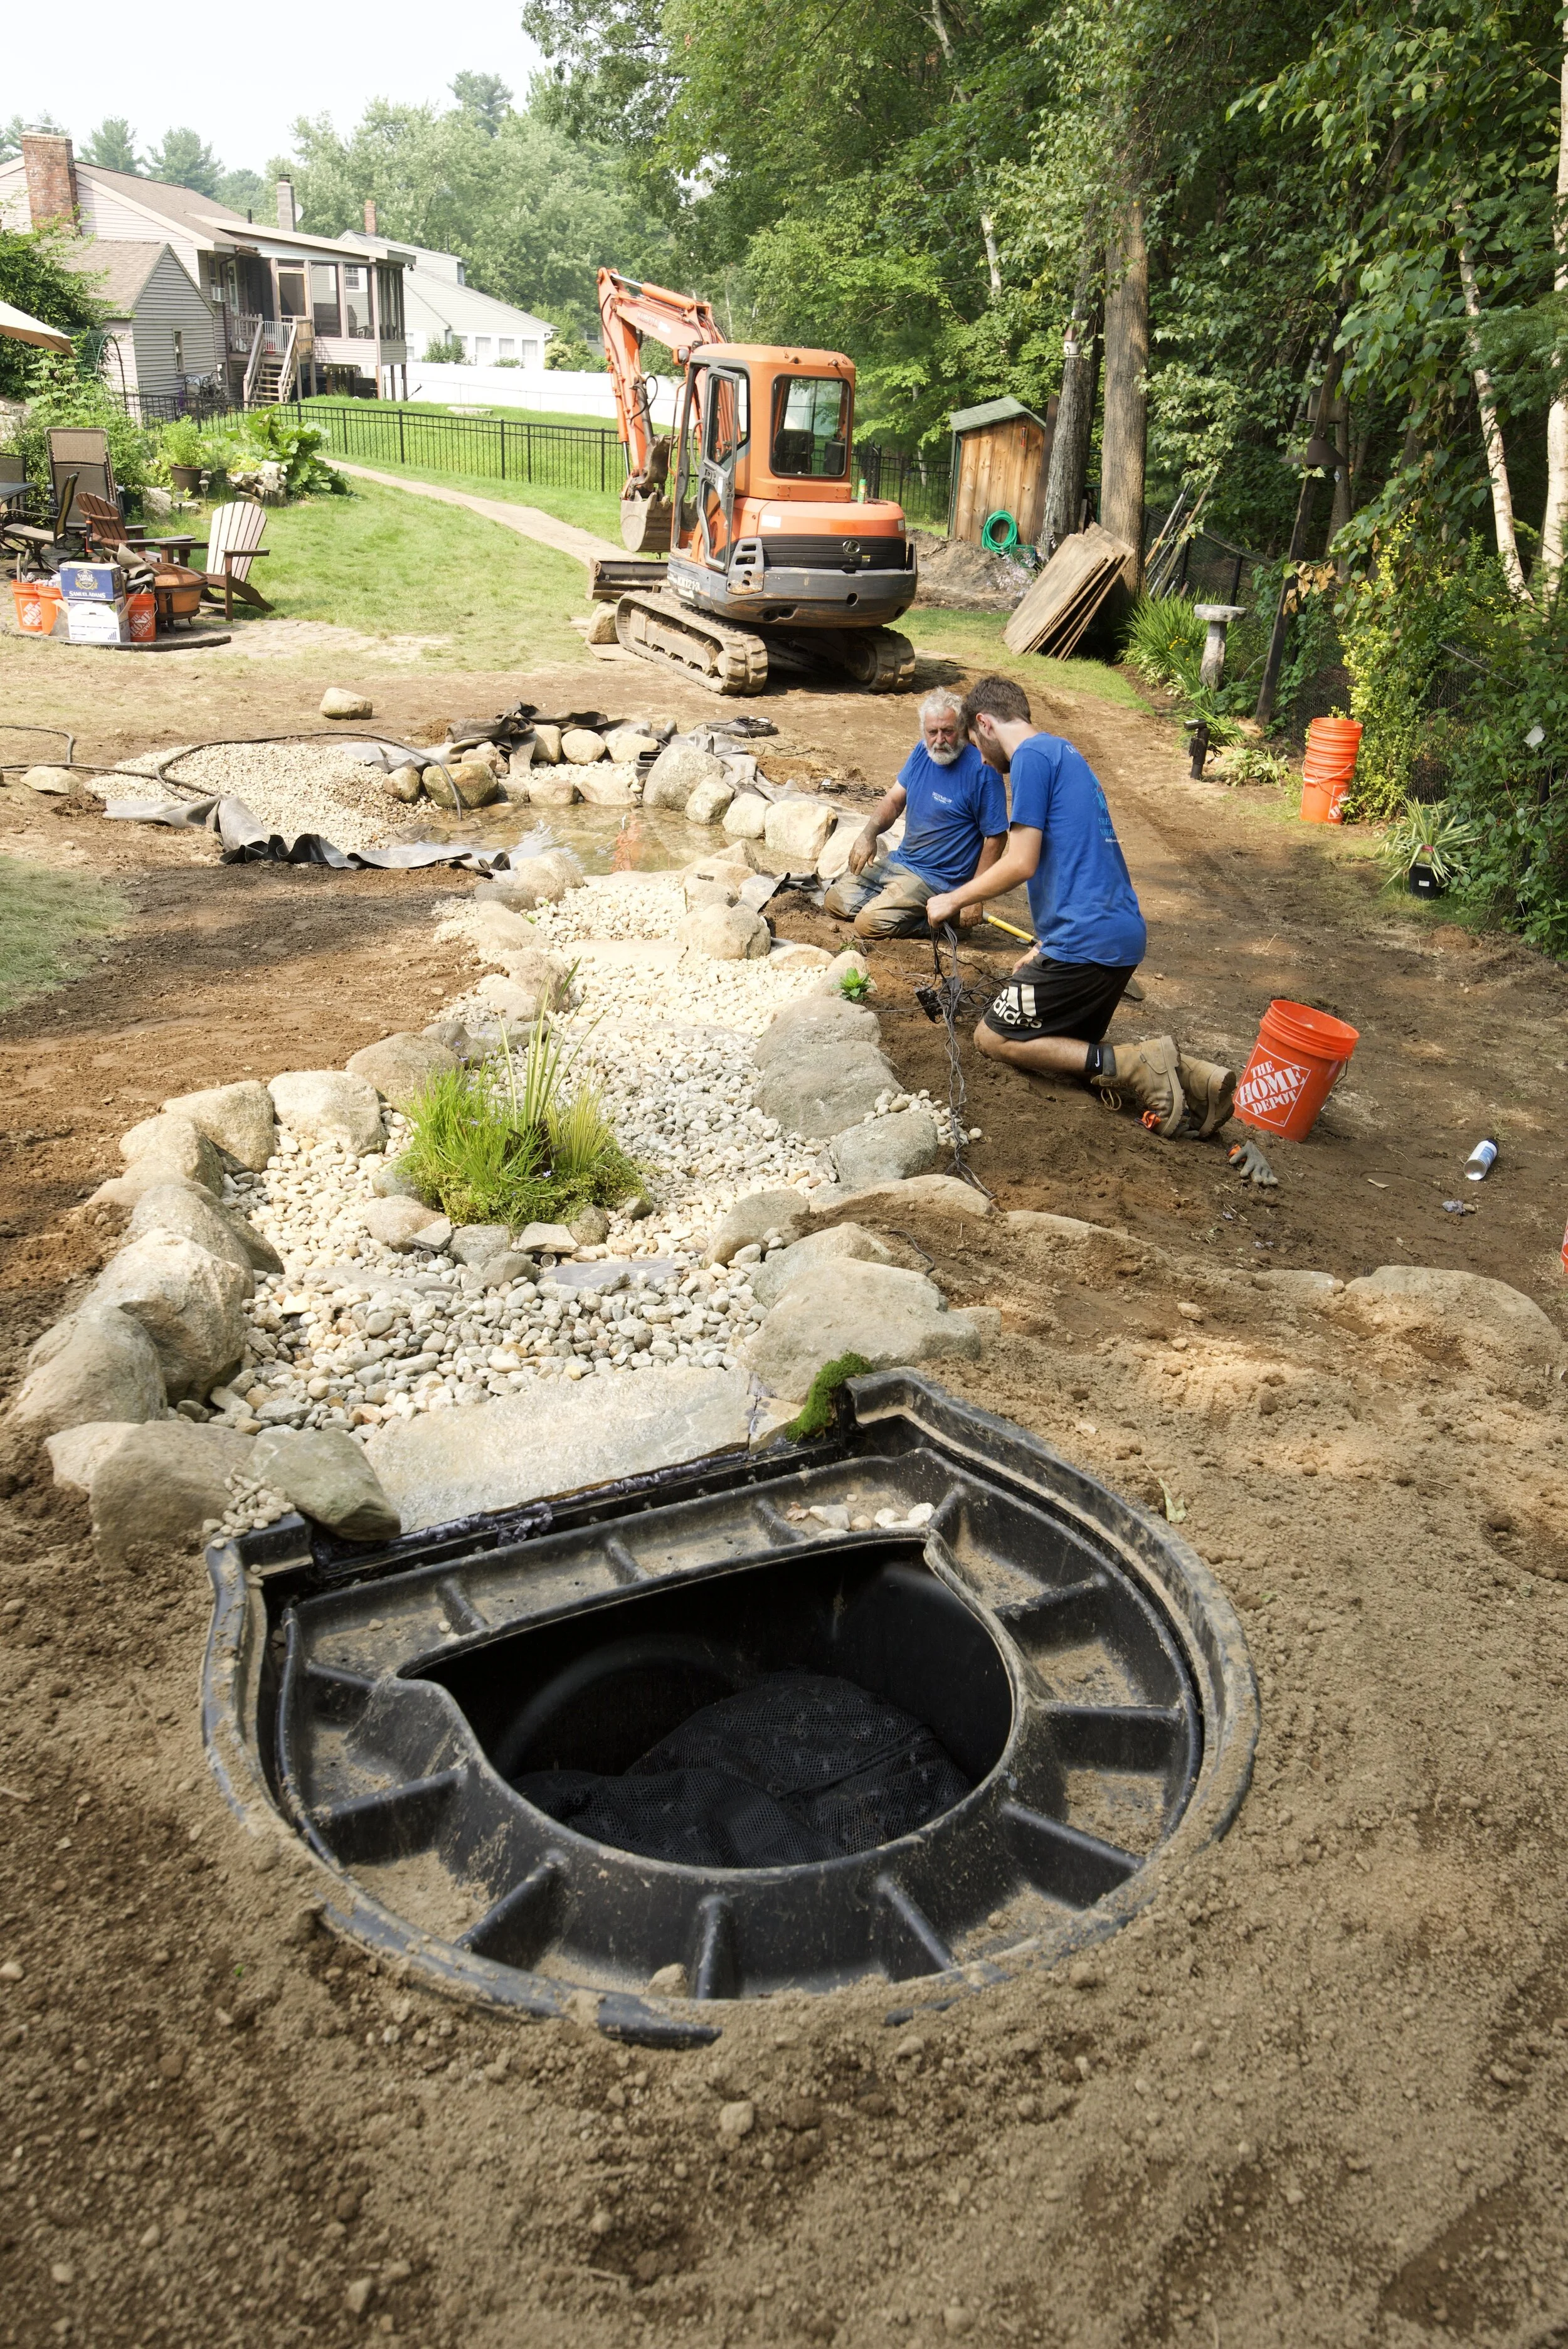
Now that the installation is done, it falls to me to plant and dress the edges. I have my work cut out for me!

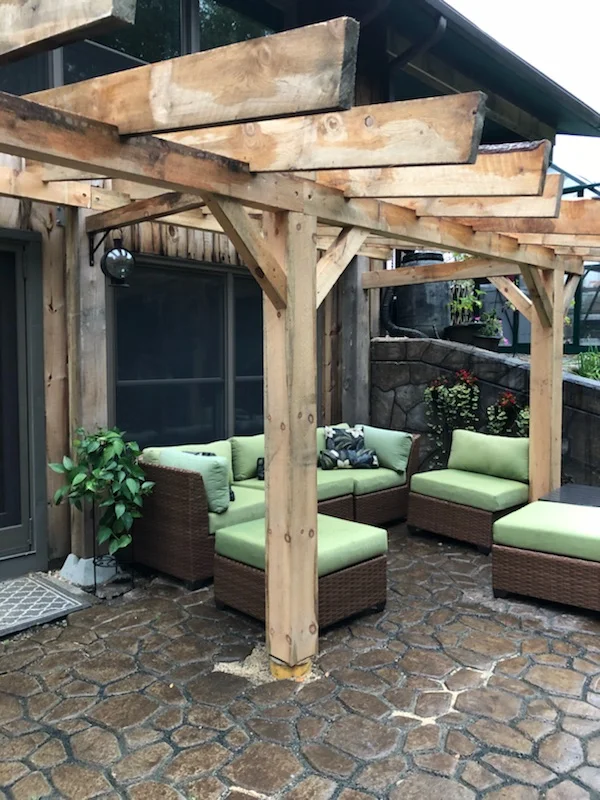
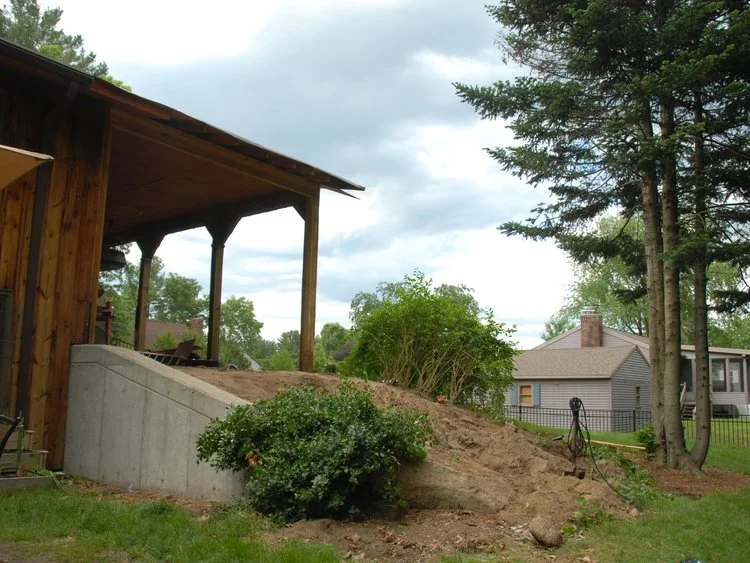
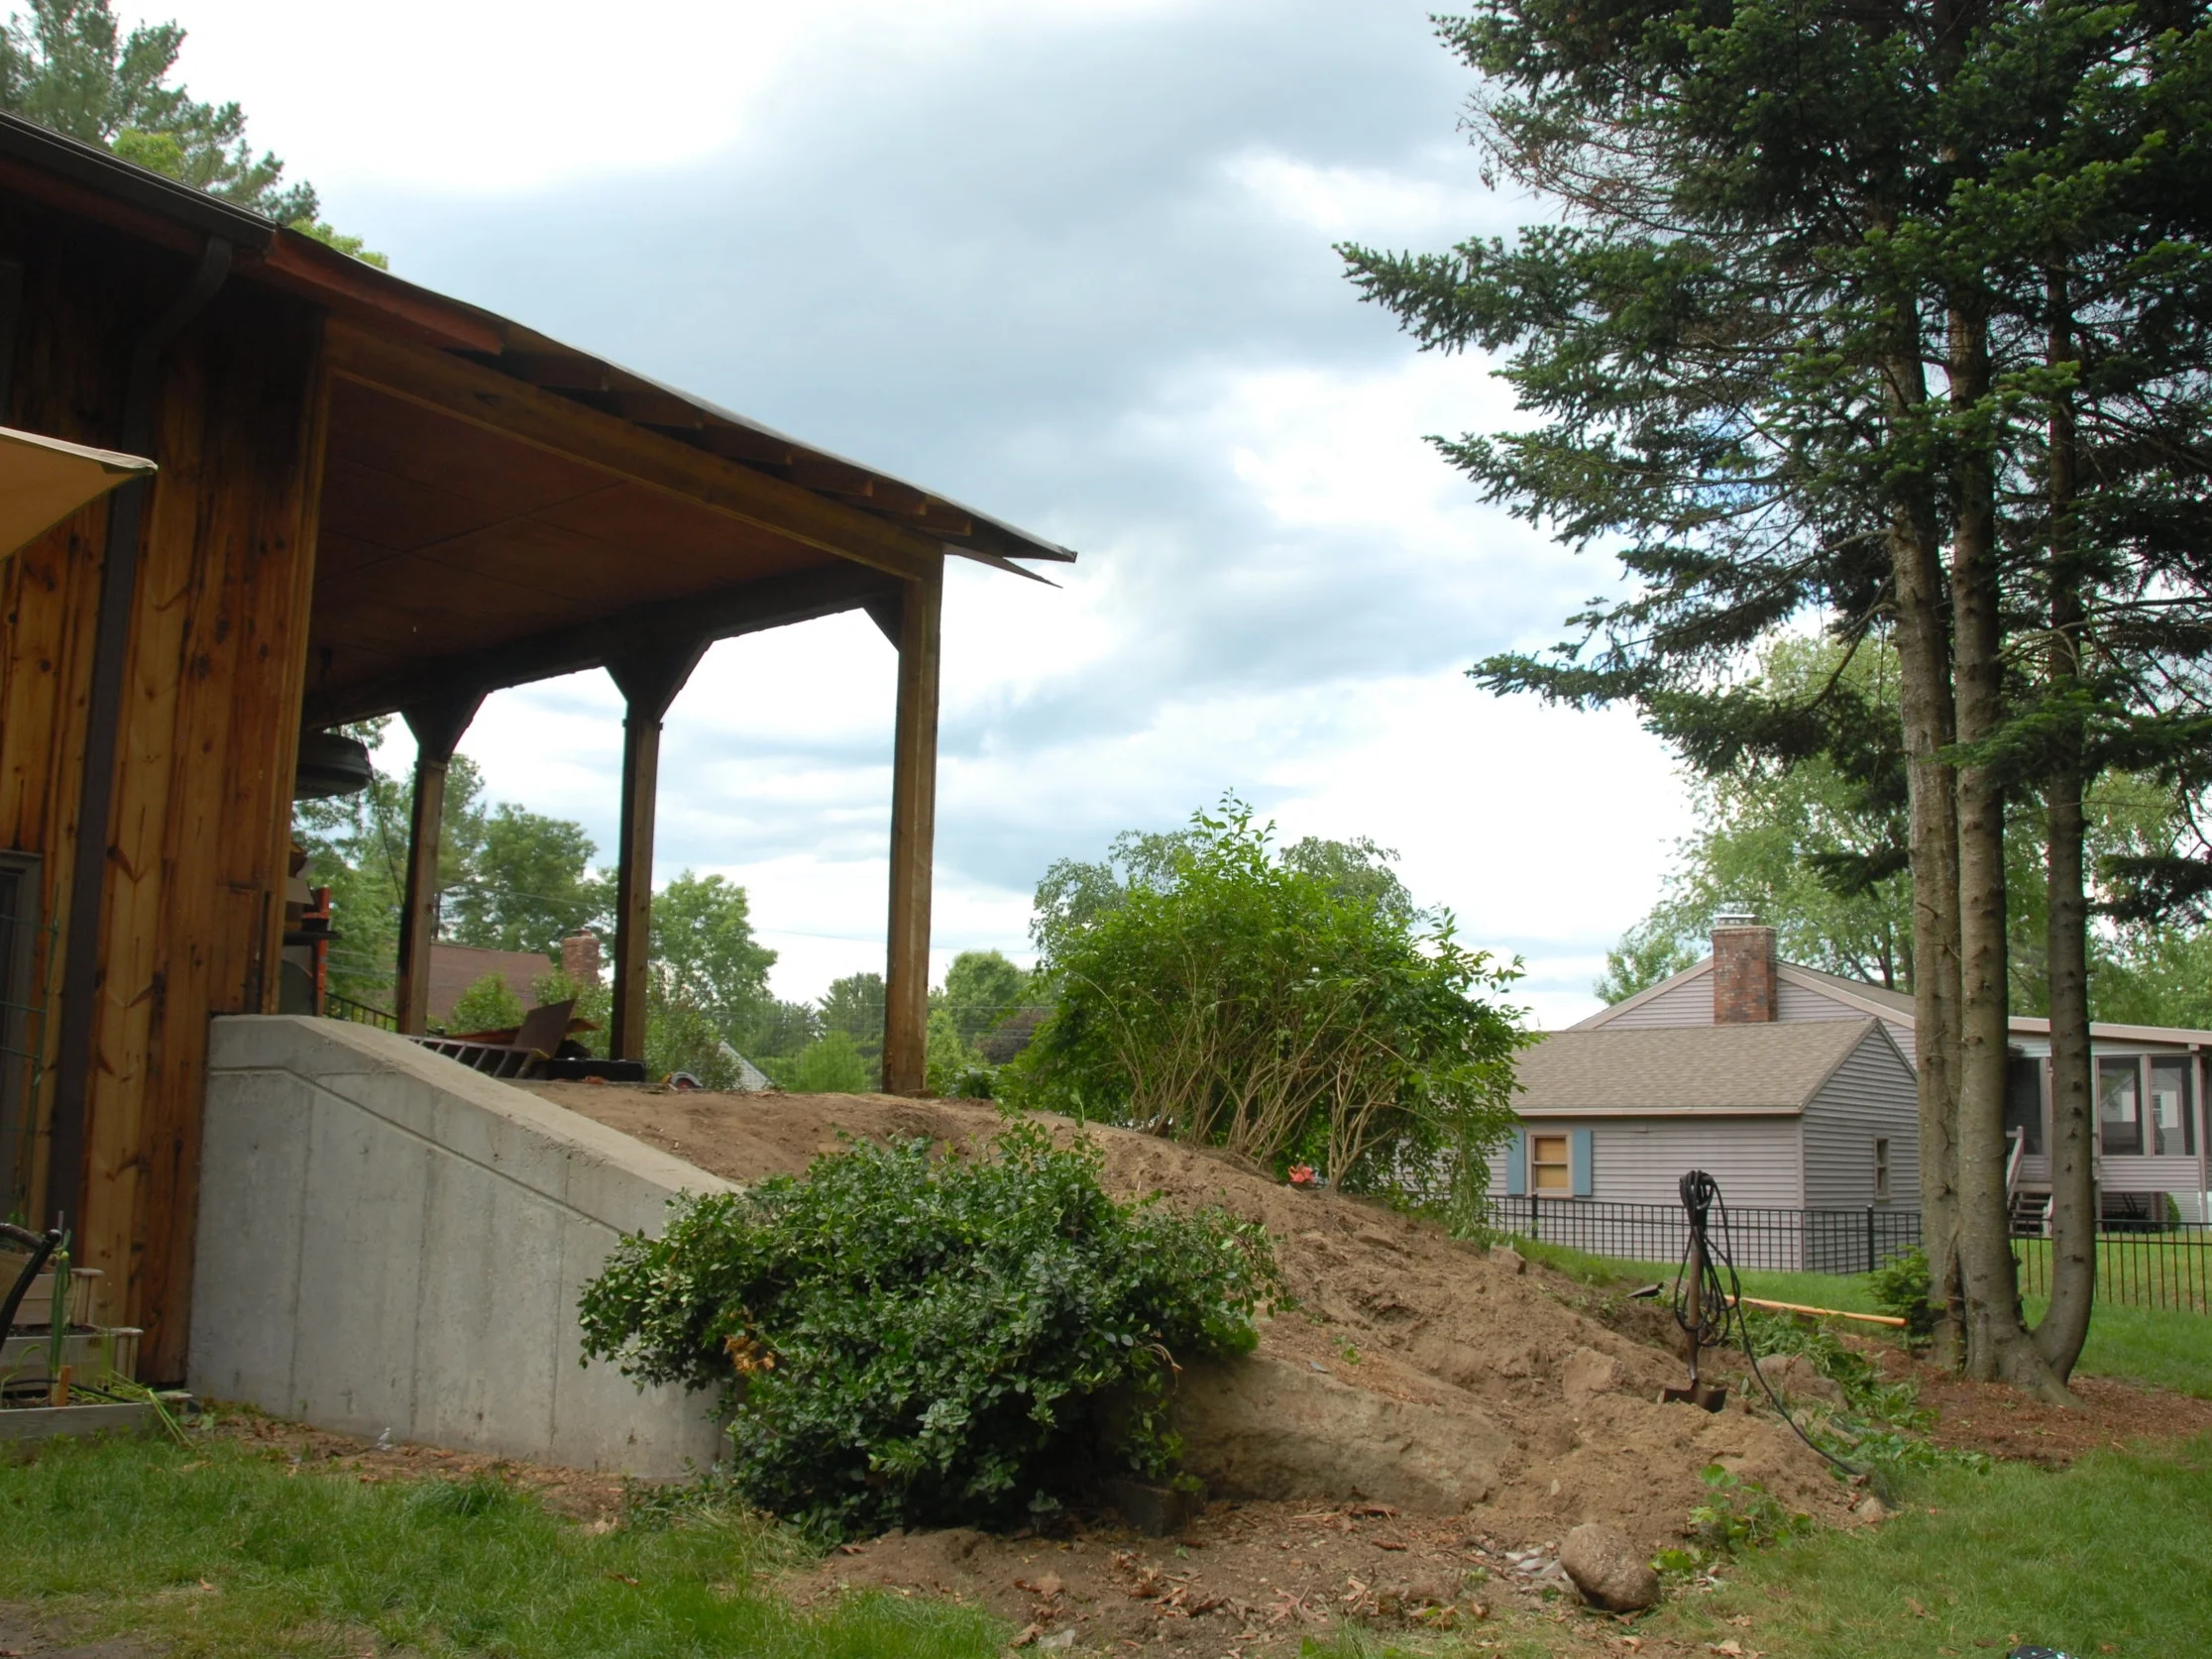
The Pergola
A covered outdoor area for lounging and entertaining.
I have been thinking and imagining a pergola since I fell in love with one I saw during the house-hunting adventures of 2013.

When I moved in, the lower yard had a pile of rocks, an ugly bush causing blackened stains on the siding, path of pavers (removed in this pic leaving grass-less holes) leading half-way into the yard, another bush blocking the windows, glaring white concrete retaining wall, and screen room on stilts.

Patio, furniture set, painted concrete, grill, dining set. To see more about the in-between steps, go read my posts about the herb garden, patio, painted wall, and screen room demolition.

Hole dug for the footings revealed a stepped foundation… perfect for ensuring that the pergola (which will be bolted to the house) is on the same solid ground as the house itself.

Concrete poured in a box shape to level up the footings.

Concrete deck pier supports the post above the ground to prevent the wood from rotting in the wet soil.

Large 7x7” posts are hand-chiseled down to 4x4” to fit into the concrete pier supports.

The post is bolted into the ledger beam (the supporting member that holds up the floor of my house) with a tempered aluminum Maine Deck Bracket. This will stabilize the post, even though it is not expected that any additional weight load will be added to the ledger. The 7x7 vertical post and 4x6 horizontal beam are dadoed together.


Next came the three front posts… the approach was to use 8” Sonotubes, since we didn’t have to contend with the foundation of the house. The entire outline was done… and then came the ‘oh sh*t’ moment. We had intended to make the pergola overhang the posts by about a foot on each side, for a total width of 22’ feet. As you can see in this picture, the beams don’t stick out past the posts. #%@#%
So, after a restless night’s sleep, Marc suggested a plan. He would replace the beams at the rear, since those were held in by a few bolts that could be easily undone. He cut new, longer beams.
The beams at the front presented a different problem, since the angle brackets had all been custom cut and toe-nailed in. He bought heavy-duty metal brackets (600-lb load rating) and affixed an extension to each end. The 45-degree supports add additional stability. Once all the rafters and decorative flourishes are added, no one will ever notice.

Back replaced with longer beams.

Front extensions.

The center beam is smaller (4x3”) and slightly higher than the outer beams to allow extra head clearance if I want to attach a light fixture someday. The horizontal center beam is cut into the vertical post, and the black metal bracket held the joint together until the rafters could be installed.
Close to done… next week the ends of the rafters will be trimmed and shaped, the patio pavers will be cut to fit around the post holes, and the plexiglass roof will be added.

For now, it’s done enough that I can put my feet up and shop Amazon for cafe-style string lights. (Edison bulbs on the way!)

My back yard setup is taking shape.

Arguably the most important accessory.

Second most important: hanging cooking tools away from curious dog tongues.
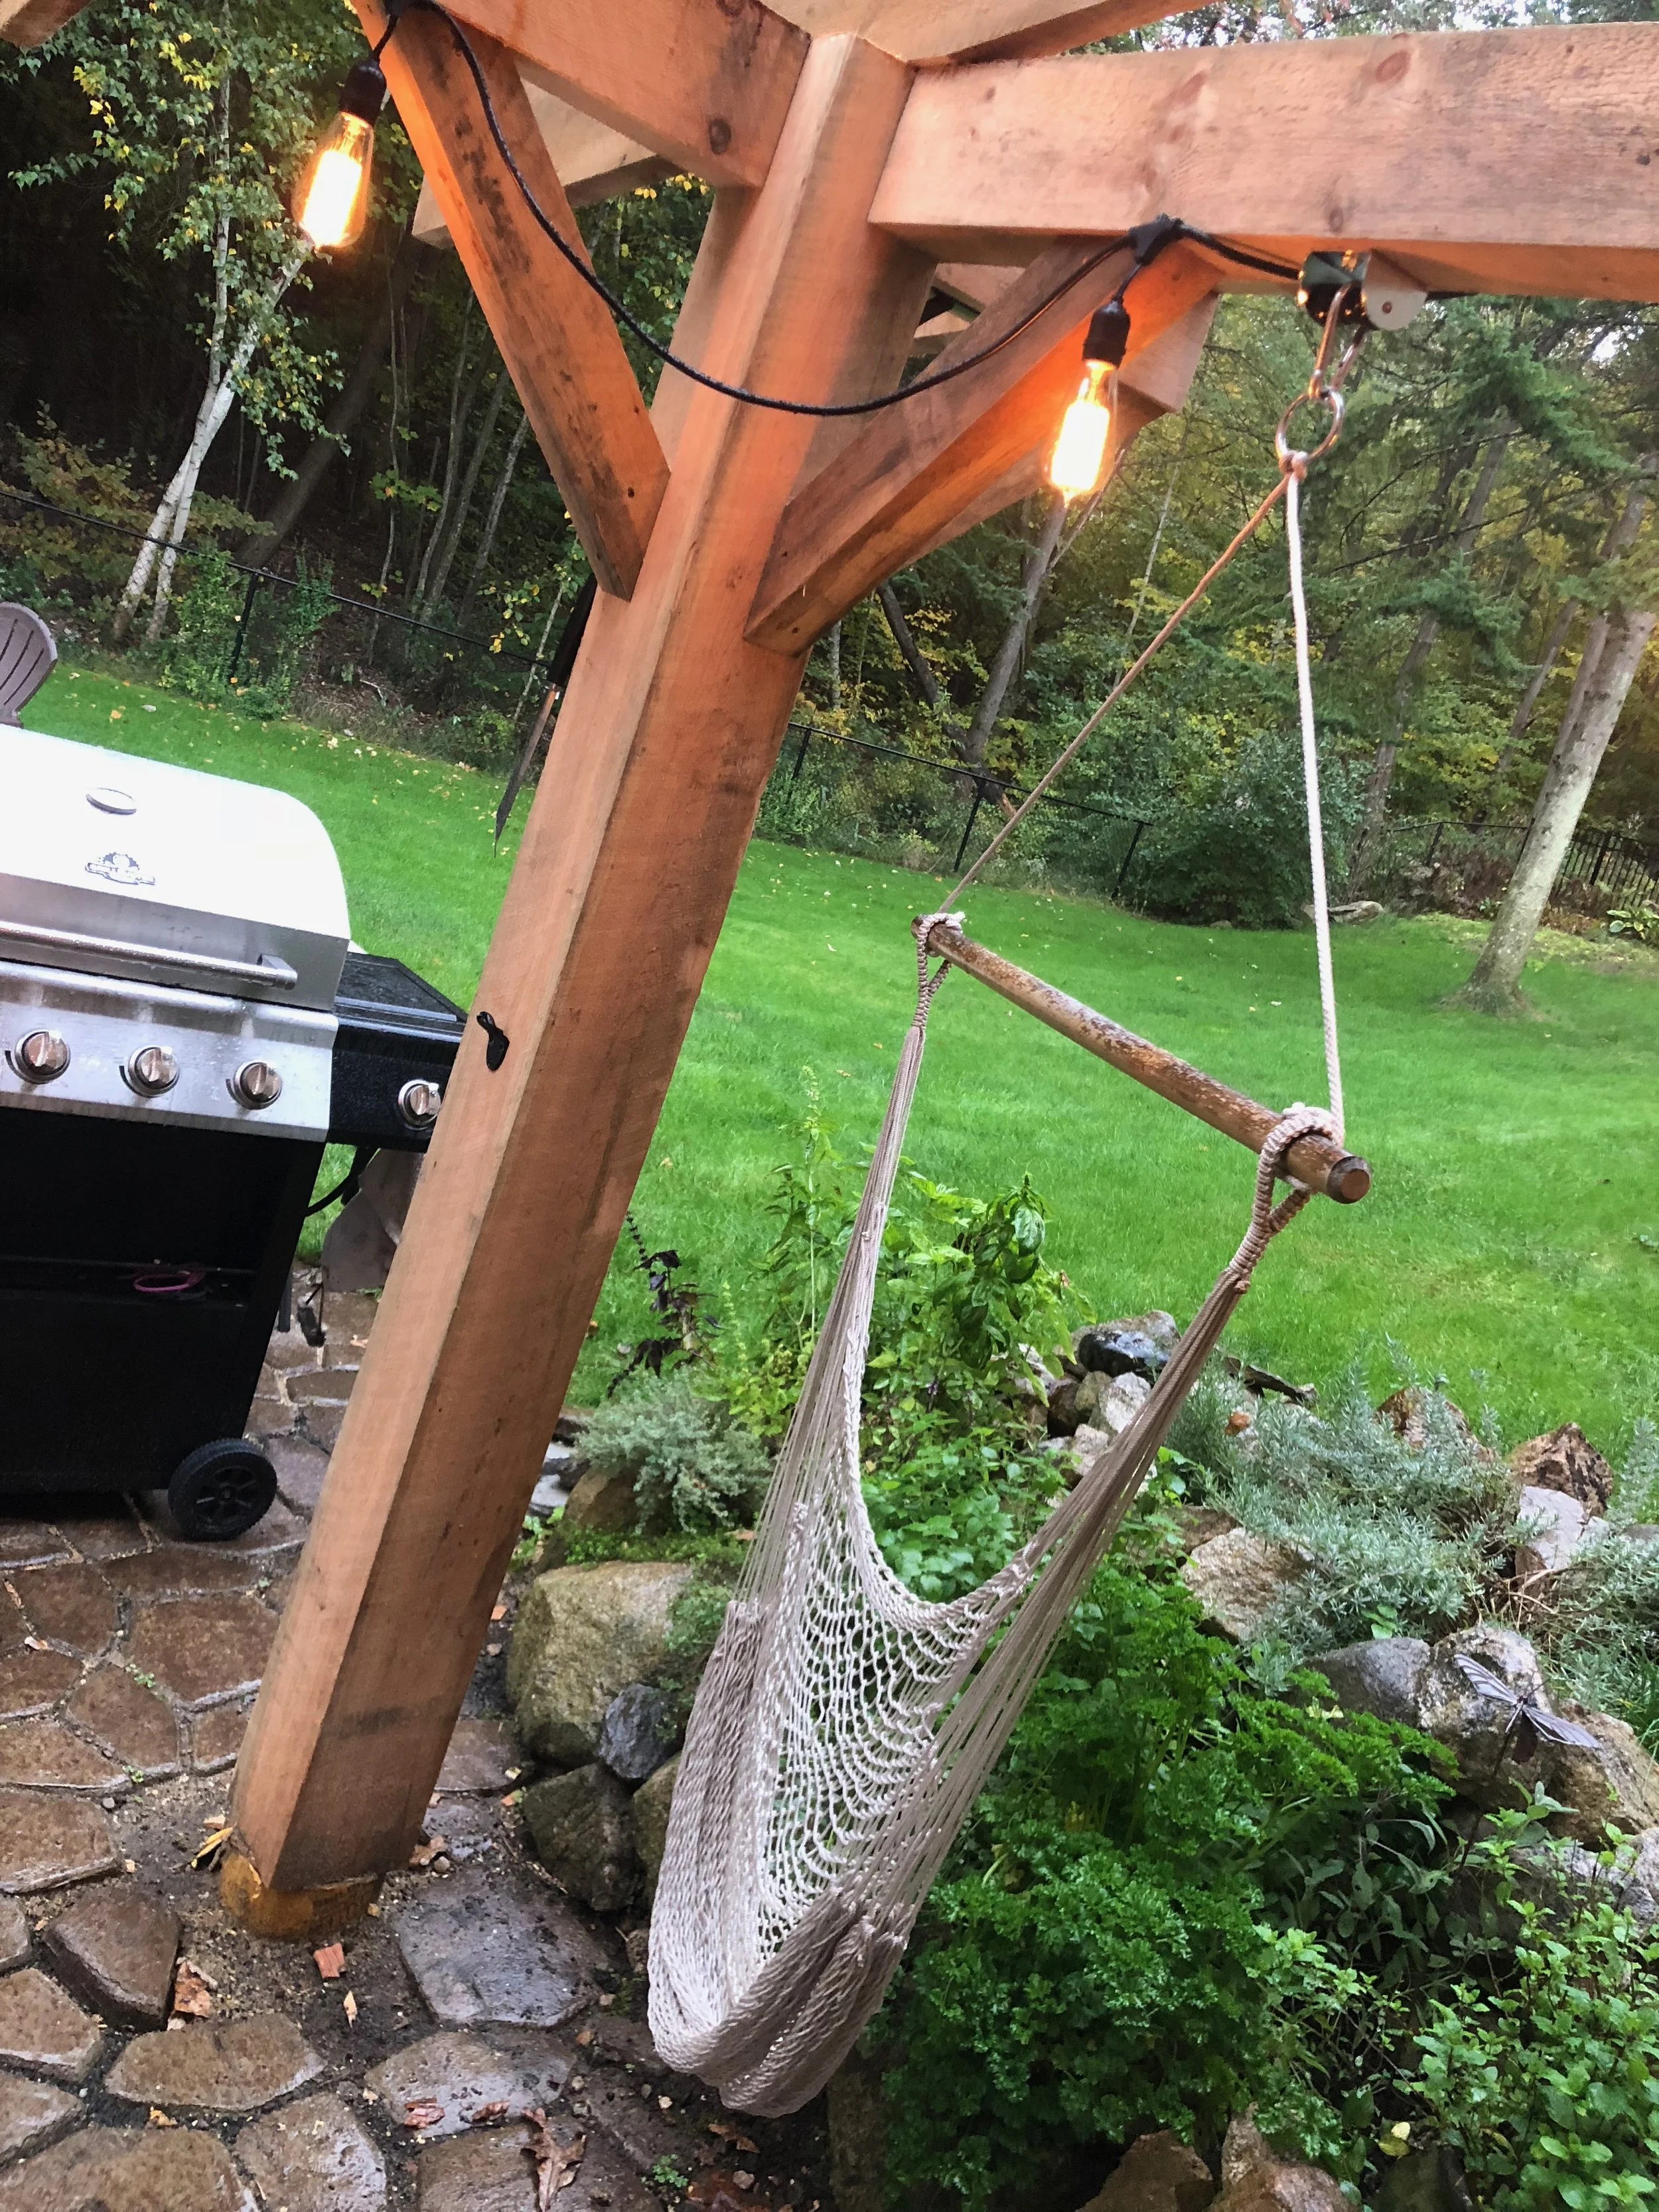
Swing seat (cushions forthcoming)

Fitting patio blocks around the posts and slab.

Front posts have trim to hide the concrete posts.

Edison bulb cafe lighting.

Rafter ends trimmed and shaped
Next it was time to get the clear polycarbonate ordered… giant sheets (6’ x 9’8”) of 1/4” Lexan. Extra strong to hold the weight of snow, and clear to let the morning sun shine into my office.
This introduced a new pain in the butt… apparently ordering 6’ wide sheets of Lexan gets you sheets that are cut at the factory at precisely 6’ and 3/4”. Which means that rafters positioned exactly 24” on-center are now a little too close together. ARGH. Rather than send these giant heavy sheets back to the glass supplier, Marc (my carpenter) grabbed the closest crowbar and yanked out a few rafters and moved them just slightly… so, if you were to climb up there with a measuring tape, you’d find that the span is no longer a perfect 24”, but roughly 25” on one side and 23” on the other. This is the kind of stuff that makes a perfectionist nuts, but I know it’s not going to bother me… until the next time I order 6’ sheets of Lexan from a place that actually knows how to measure.


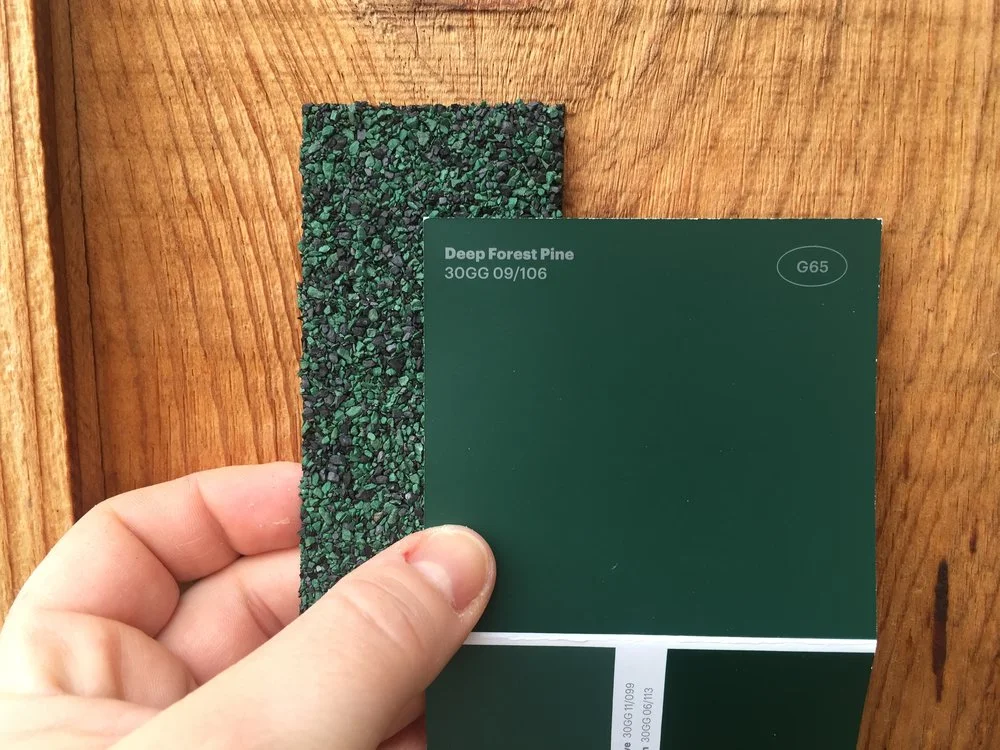
Painted Eaves
What a difference a paint job can make.
When I bought the house, the reddish-brown roof tied in nicely with the rust-red colored eaves... the painted soffit and fascia with a brown aluminum gutter. The problem was... I didn't much like the roof color, and it was in bad shape. When I replaced the roof, I chose green. And it contrasted hideously with the red paint.

Glidden Premium Exterior Paint: Deep Forest Pine, Flat Finish
The professional painter community started out skeptical of Glidden... but since it's been reformulated into the 'Premium' line, it offers a good thick paint with excellent coverage and color density... at about $20/gal instead of the competitor's $75/gal. Now, I'm totally willing to pay more for high quality, but if I can get very good quality cheaper, I like that, too.
I'm exceptionally pleased with the end result. No more peeling, flakey brick-red-fading-to-odd-mauve. It's a thick, velvet smooth coat of lush green. Flat, but washable. Bingo.


Irrigation
An efficient watering system uses less water and results in healthier grass.
After enjoying the benefits of my vegetable garden irrigation, I decided to upgrade the entire yard. The guys at Rainmaker Irrigation were awesome… they did a fabulous job scoping out the work, running the water lines through the yard, and coming twice a year to perform system start up and shut down. The owner David had lots of knowledge about how to best run drip lines to keep my flowers and vegetables irrigated as well.
While we’re at it, I added three spigots so eliminate the need to drag hundreds of feet of hose around the yard… one by the shed, on in the greenhouse, and one in the far front corner.


How not to water
Rachio 3
I insisted on installing a smart controller. Some controllers have taken the first step… which means if I happen to be awake at 5 am when my system is watering in the rain, I can use my phone to turn it off. UM - NO. Not smart enough for me. I want my controller to know if it has rained, or is raining, or will rain, and water accordingly… enter Rachio. (Bonus: geo geeks will appreciate the soil science write up in the Help menu. Precision watering is no joke!)


18 Trees
More sun, fewer acorns, and less scraggly dead junk.
I'm biting the bullet and having trees removed. EIGHTEEN trees. And the thing is... this won't even make a dent in the forested sanctuary of my back yard. The biggest difference will be to the front yard, where 4 out of the 5 trees will be removed.
I feel somewhat guilty about the oak... it is a nice tree. At least, it's nice until early November, when I start to curse its name. The leaves of my maples fall politely all at once, and I dedicate one afternoon to mulching them for my garden beds. The leaves on the oak, on the other hand, start falling around Halloween and continue to fall until March. And then there's all the other droppings... the tree is always pooping sticks onto my yard. It's also decorated with widow-makers: giant broken limbs hanging 60 feet up, just waiting for the perfect storm to knock them loose.
And then there's the ACORNS. Millions of them. The yard becomes like the ball pit at Ikea, if the balls were marbles with tiny sharp prongs that stab the bottoms of bare feet. I swear the squirrels throw them with force... my bedroom is a percussion instrument. I *!@%$* hate acorns.

Giant oak and three dying firs... these are on my top-ten list of trees to remove.
Then there are the scraggly ugly trees in the back yard that are irritating to mow around and add no beauty. There are a few crowded fir trees that are becoming weak and attracting carpenter ants... they're dead vertical fire starters. A couple others have made sport of dropping onto my fence.


Above: One of the black birches in a small stand decided to let go one winter storm. Just as well, since I keep having to rip out the root-runner babies.
Left: A storm in December 2014 snapped this leaning maple in half. I'm not sad to see them go, since its brother is bigger, and leaning farther onto my property. It worried me that someday they'd hurt more than just the fence.

Sadie surveys the wreckage.

Loam spread in the front yard.
The yard before, with 14 trees scheduled to be removed.
The yard after, with plenty of trees left.

Patio
Backyard patio flanked by gardens for entertaining, lounging, and growing.
Before
A narrow walk of sunken pavers connected the back door and screen room stairs, and then trailed off into the yard. The two bushes had outgrown the attractive size, blocking the windows and leaving black splotches on the outside of the house.

During

After
I love stepping out of the basement French doors onto my patio.


New Roof
A big project.
I knew that the roof had some issues when I bought the house. Some were easy to see from the ground, others were pointed out by my inspector. The sheathing was too thin for the 24" span of the rafters, and in some places it wasn't nailed to the rafter at all, allowing for a sagging appearance and obvious squish when stepped on. Inside, the heat damage illustrated the poor ventilation.


So... quotes. And more quotes. Each one higher than the last... except for the one guy in a pickup truck who sent his teenager onto my roof (without appointment or permission) while I was in the middle of a conference call. He was the cheapest. And I didn't hire him.
I learned all about soffit vents and ridge vents and underlayment and more than I care to know about roofs. What I do know is that I have 6 feet of crazy thick coating around all the edges of my house to prevent ice dams from leaking through, and then other self-healing awesomeness over the whole house, and a ridge vent that's extra puffy, and a 50 year warranty. Yep, five-zero. 50.


New roof! I painted the shed door and trim to demonstrate the new color scheme... but I still need to get the eaves of the house painted.


Screen Room Demolition
Time for a major change... no more looking out the living room window at the screen room.
When I bought the house, I couldn't figure out how best to use the screen room. It was disconnected from the house, and hovering above the yard... this was a great concept that was badly executed. It became storage. Storage with a rotting floor, shaky stairs, torn screens, and squishy roof. What a mess. I was getting the house re-roofed, so I needed to cut bait.
This was not a job for one. Especially not this one. I hired a local gentleman who does home rejuvenation projects, and occasionally hires the son of my neighbor. Two short days later, the room was gone, and I was left with a sandy slope. (See my Terraced Vegetable Garden for how it turned out.)

I appreciate bug protection, but I want to entertain in the yard, not above it.

The screen room is a collector for pollen and dead bugs.

Crud underneath.

Roof mush needed a spatula moreso than a crow bar.

Ready for haul-away
The sandy slope beneath filled with debris.

Much nicer.

Fence
First major project: FENCING. I want my sanctuary to extend to my yard so the pups can roam.
I'm so very grateful to Hulme Fence for installing my fence in the December snow. I tried to keep them toasty, with donuts & mulled cider & Keurig stationed in the tiled room downstairs. Between these hard workers and Home Depot's 0% interest financing, this was my best first new-home-owner decision ever.
Installation was made tricky by the knee-deep snow. The corner went a little over my property line, and Hulme Fence will come back as soon as the ground thaws to reposition it.
Update, Spring 2014: Hulme Fence contacted me in the early spring and made quick work of the repositioning. I'm always grateful when a company demonstrates good business integrity - thank you, Hulme!
I loved not having to leash up for every potty break all winter long. And now that the spring has sprung, Maddox (pictured, right) and Sadie love the freedom of lounging around in the grass on sunny days, regardless of if Mom has to be at work.