Pond Flora and Fauna
You probably saw this coming: MORE plants.
The pond’s ecosystem is a new experiment for me. Luckily there’s plenty of information online to make the learning curve a little less steep.

Infographic from https://www.pondexperts.ca/pond-plant-depth-zones/
My Aquatic Collection
As I started browsing catalogs of aquatic plants, I was surprised at how many from my existing garden could thrive with their roots submerged in water. The aquatic plant expert at my local shop says to rinse off the roots… because these plants need nutrients dissolved in water, not actual soil, there’s no sense in dirtying the pond water.
Volunteer Nature
I decided I didn’t want to (yet) deal with fish in my pond, which would add another level of maintenance and complexity. Fish require feeding, correct pH, and winter aeration. Instead, I let my pond be a habitat for the woodland creatures that show up to visit, feed themselves, and do whatever they do in the winter. It has made for some interesting nature watching.


Stream Finishing Part 2: Gravel Garden
After Michele helped me clear the giant weed mess (see Stream Finishing Part 1: Mulch Corner), I pinned down landscape fabric to prevent the weeds from sprouting right back up again while I waited for my trees to be installed.

I picked out two beautiful trees to be installed by my local garden center. Like everyone else, they’re crazy busy and booked out. Finally my beauties arrived.

Ruby Falls Redbud: Cercis canadensis 'Ruby Falls'

Japanese Maple: Acer palmatum dissectum 'Red Dragon'

Acer Crimson Queen, Japanese Laceleaf Maple

Cercis Ruby Falls, Weeping Redbud

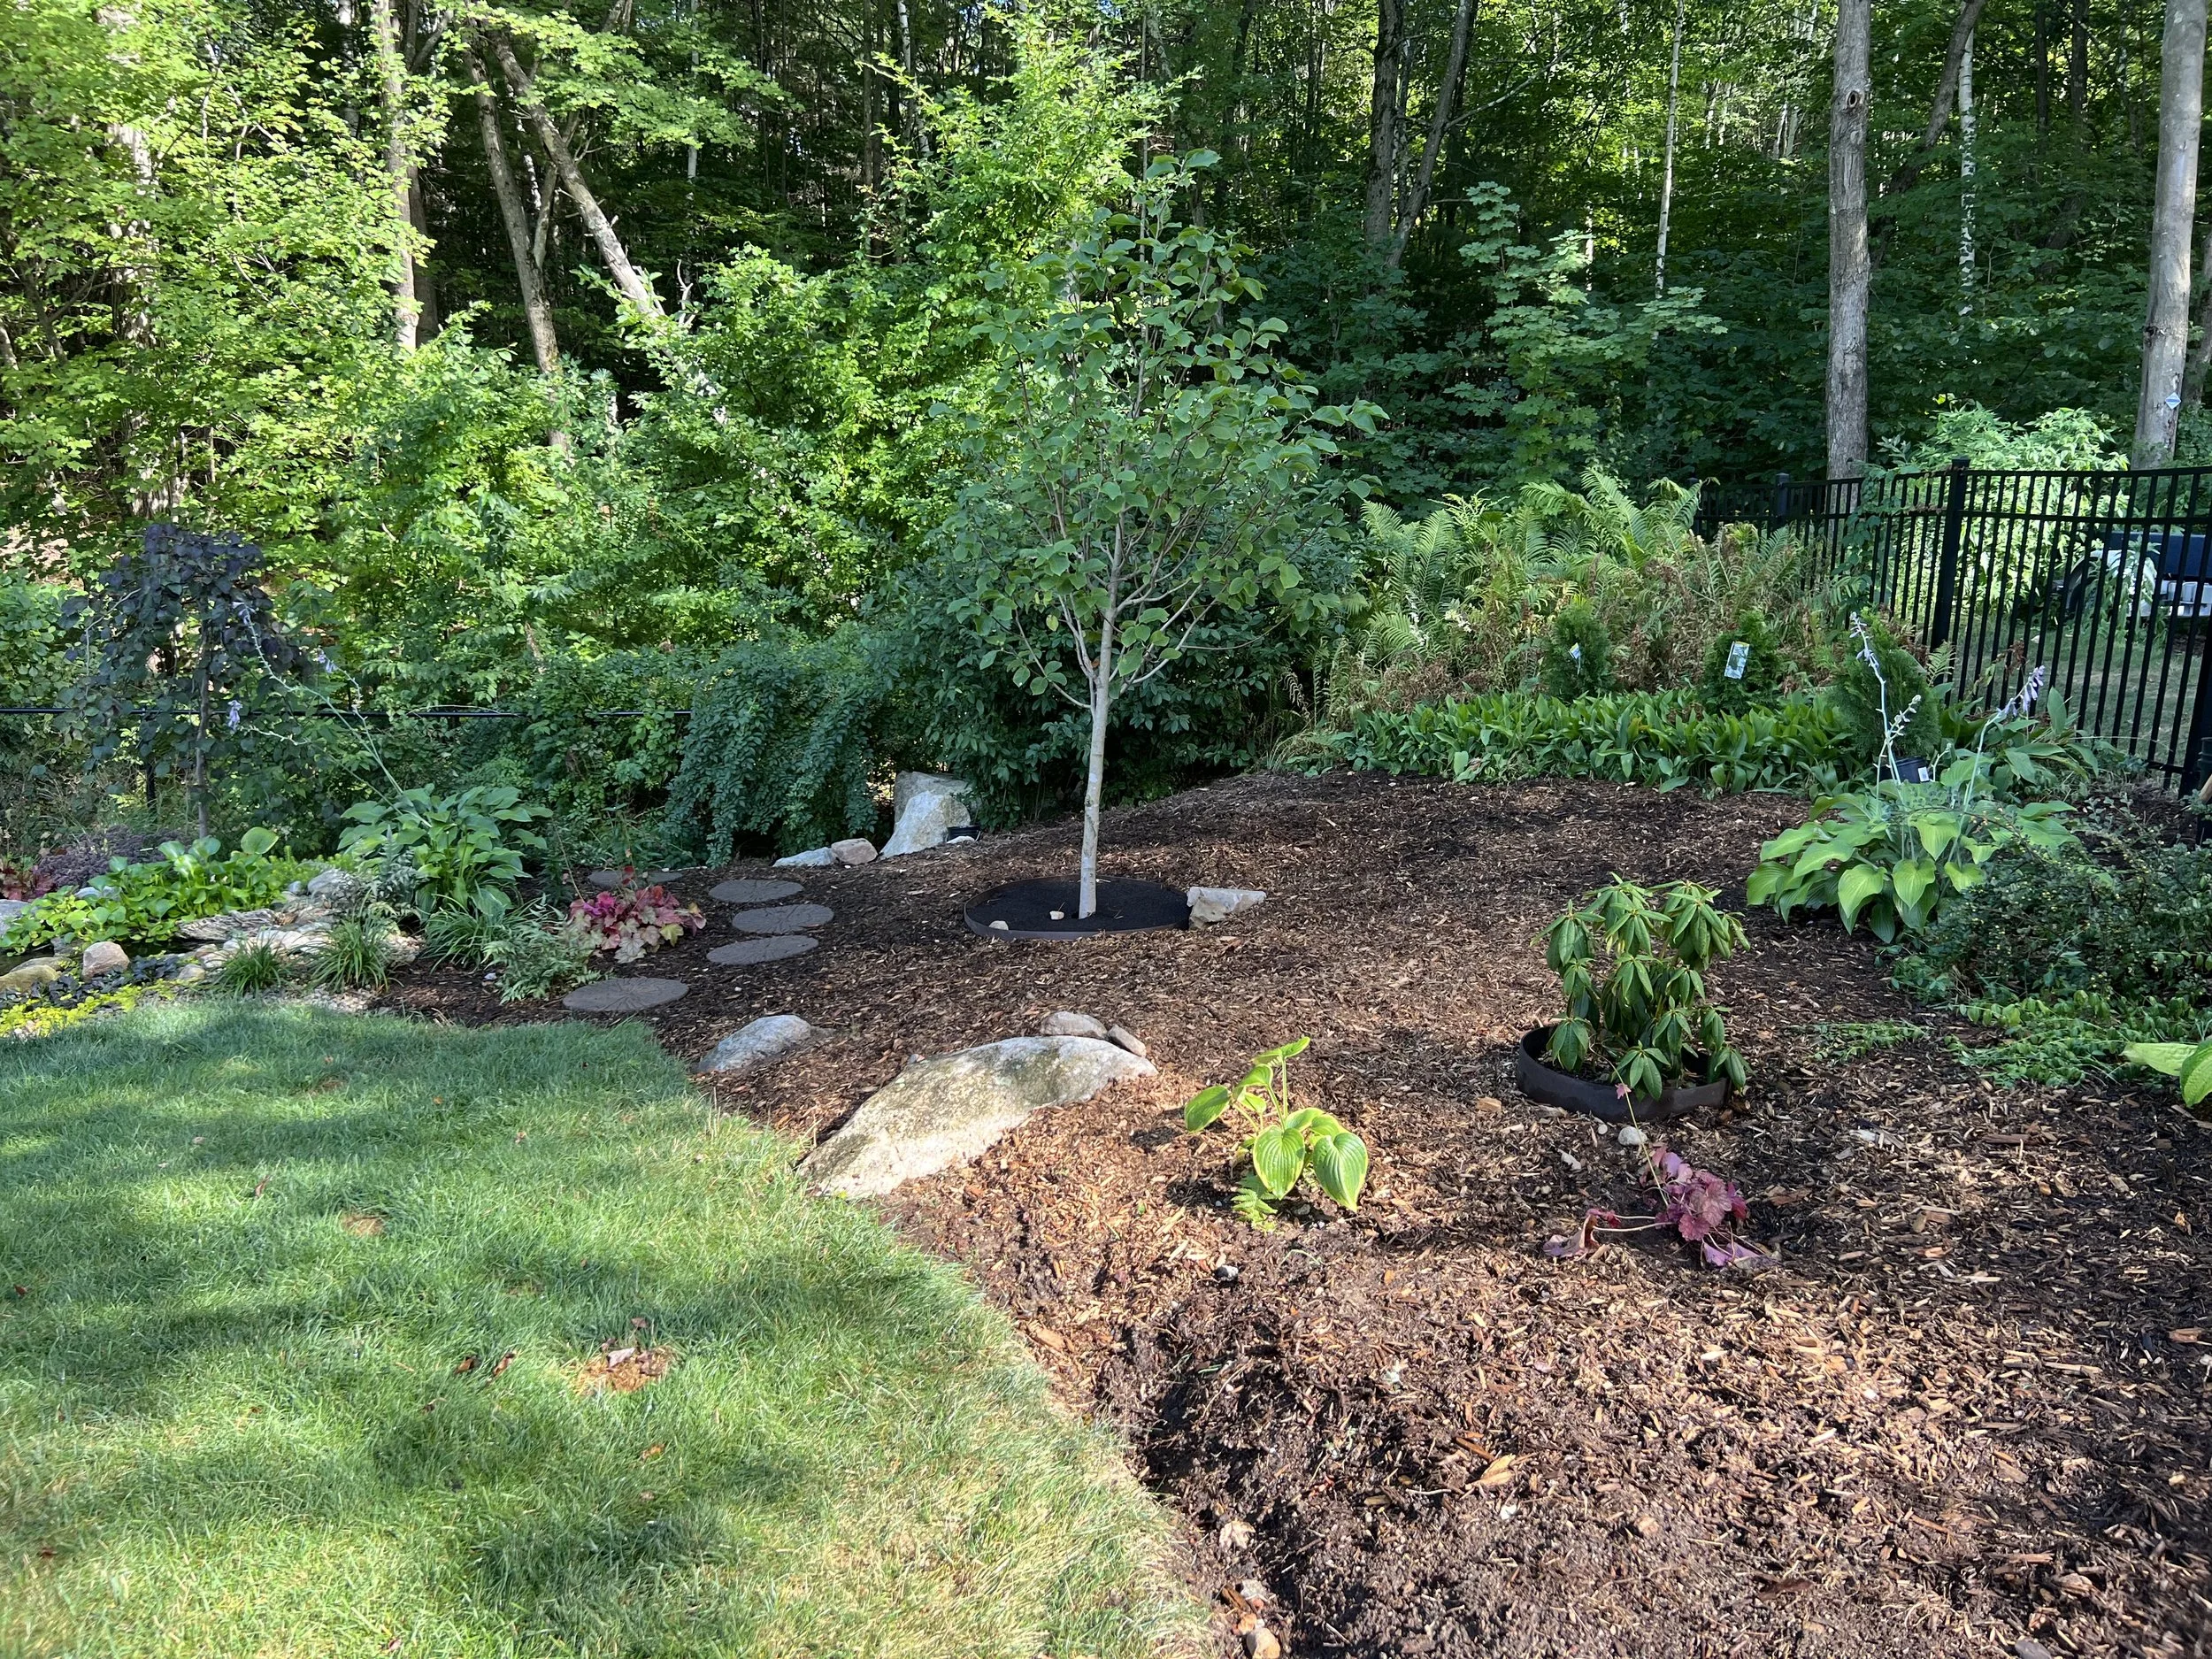
Trees behind the stream
Now the rocks. Despite the stream being a completely artificial construct, I want to at least try to give it the variation you might find in nature.

1.5” rounded stone

2 cubic yards of the 1.5” and 1 cubic yard of the 2-3”

2-3” rounded stone

First few wheelbarrow loads

Stream Finishing Part 1: Mulch Corner
My concept for the area between the stream and the fence is that it contains year-round interest, and it never needs mowing. This means focusing on plants that keep their structure throughout the winter, as opposed to most of my garden plants which die back to the ground. I decided to install a mulched garden at the top, and a gravel garden below.
I’m also hoping to reduce the amount of weeding it needs… because holy hell look at this mess:

In one of my all-too-frequent moments of garden despair and frustration, Michele came over to help. For those of you who don’t know Michele, she’s my friend & neighbor, and she’s a powerhouse in the garden. She frequently shares her divided plants, and everything in her care seems to flourish. See for yourself:

It started as just a little. And a little more. And a little later I mentioned that my back had started to ache… and Michele said, ‘Yep - mine too!’ and didn't miss a beat slamming the shovel into the weed pile. She’s a machine. We got the entire thing done in one go.
We decided to use plastic tarps to smother the established grass at the top of the stream.
Then the waiting.
Grass at the top of the slope is adequately smothered, and I’m tired of looking at the ugly tarps. This is where the elbow grease takes over.

The silver tarp smothered the grass during our 90+ degree heat wave and drought.

The area looks bigger from above.

Pulling clumps of dead grass, spreading landscape fabric, and covering with mulch.

Plantings at the top of the stream are coming along nicely.

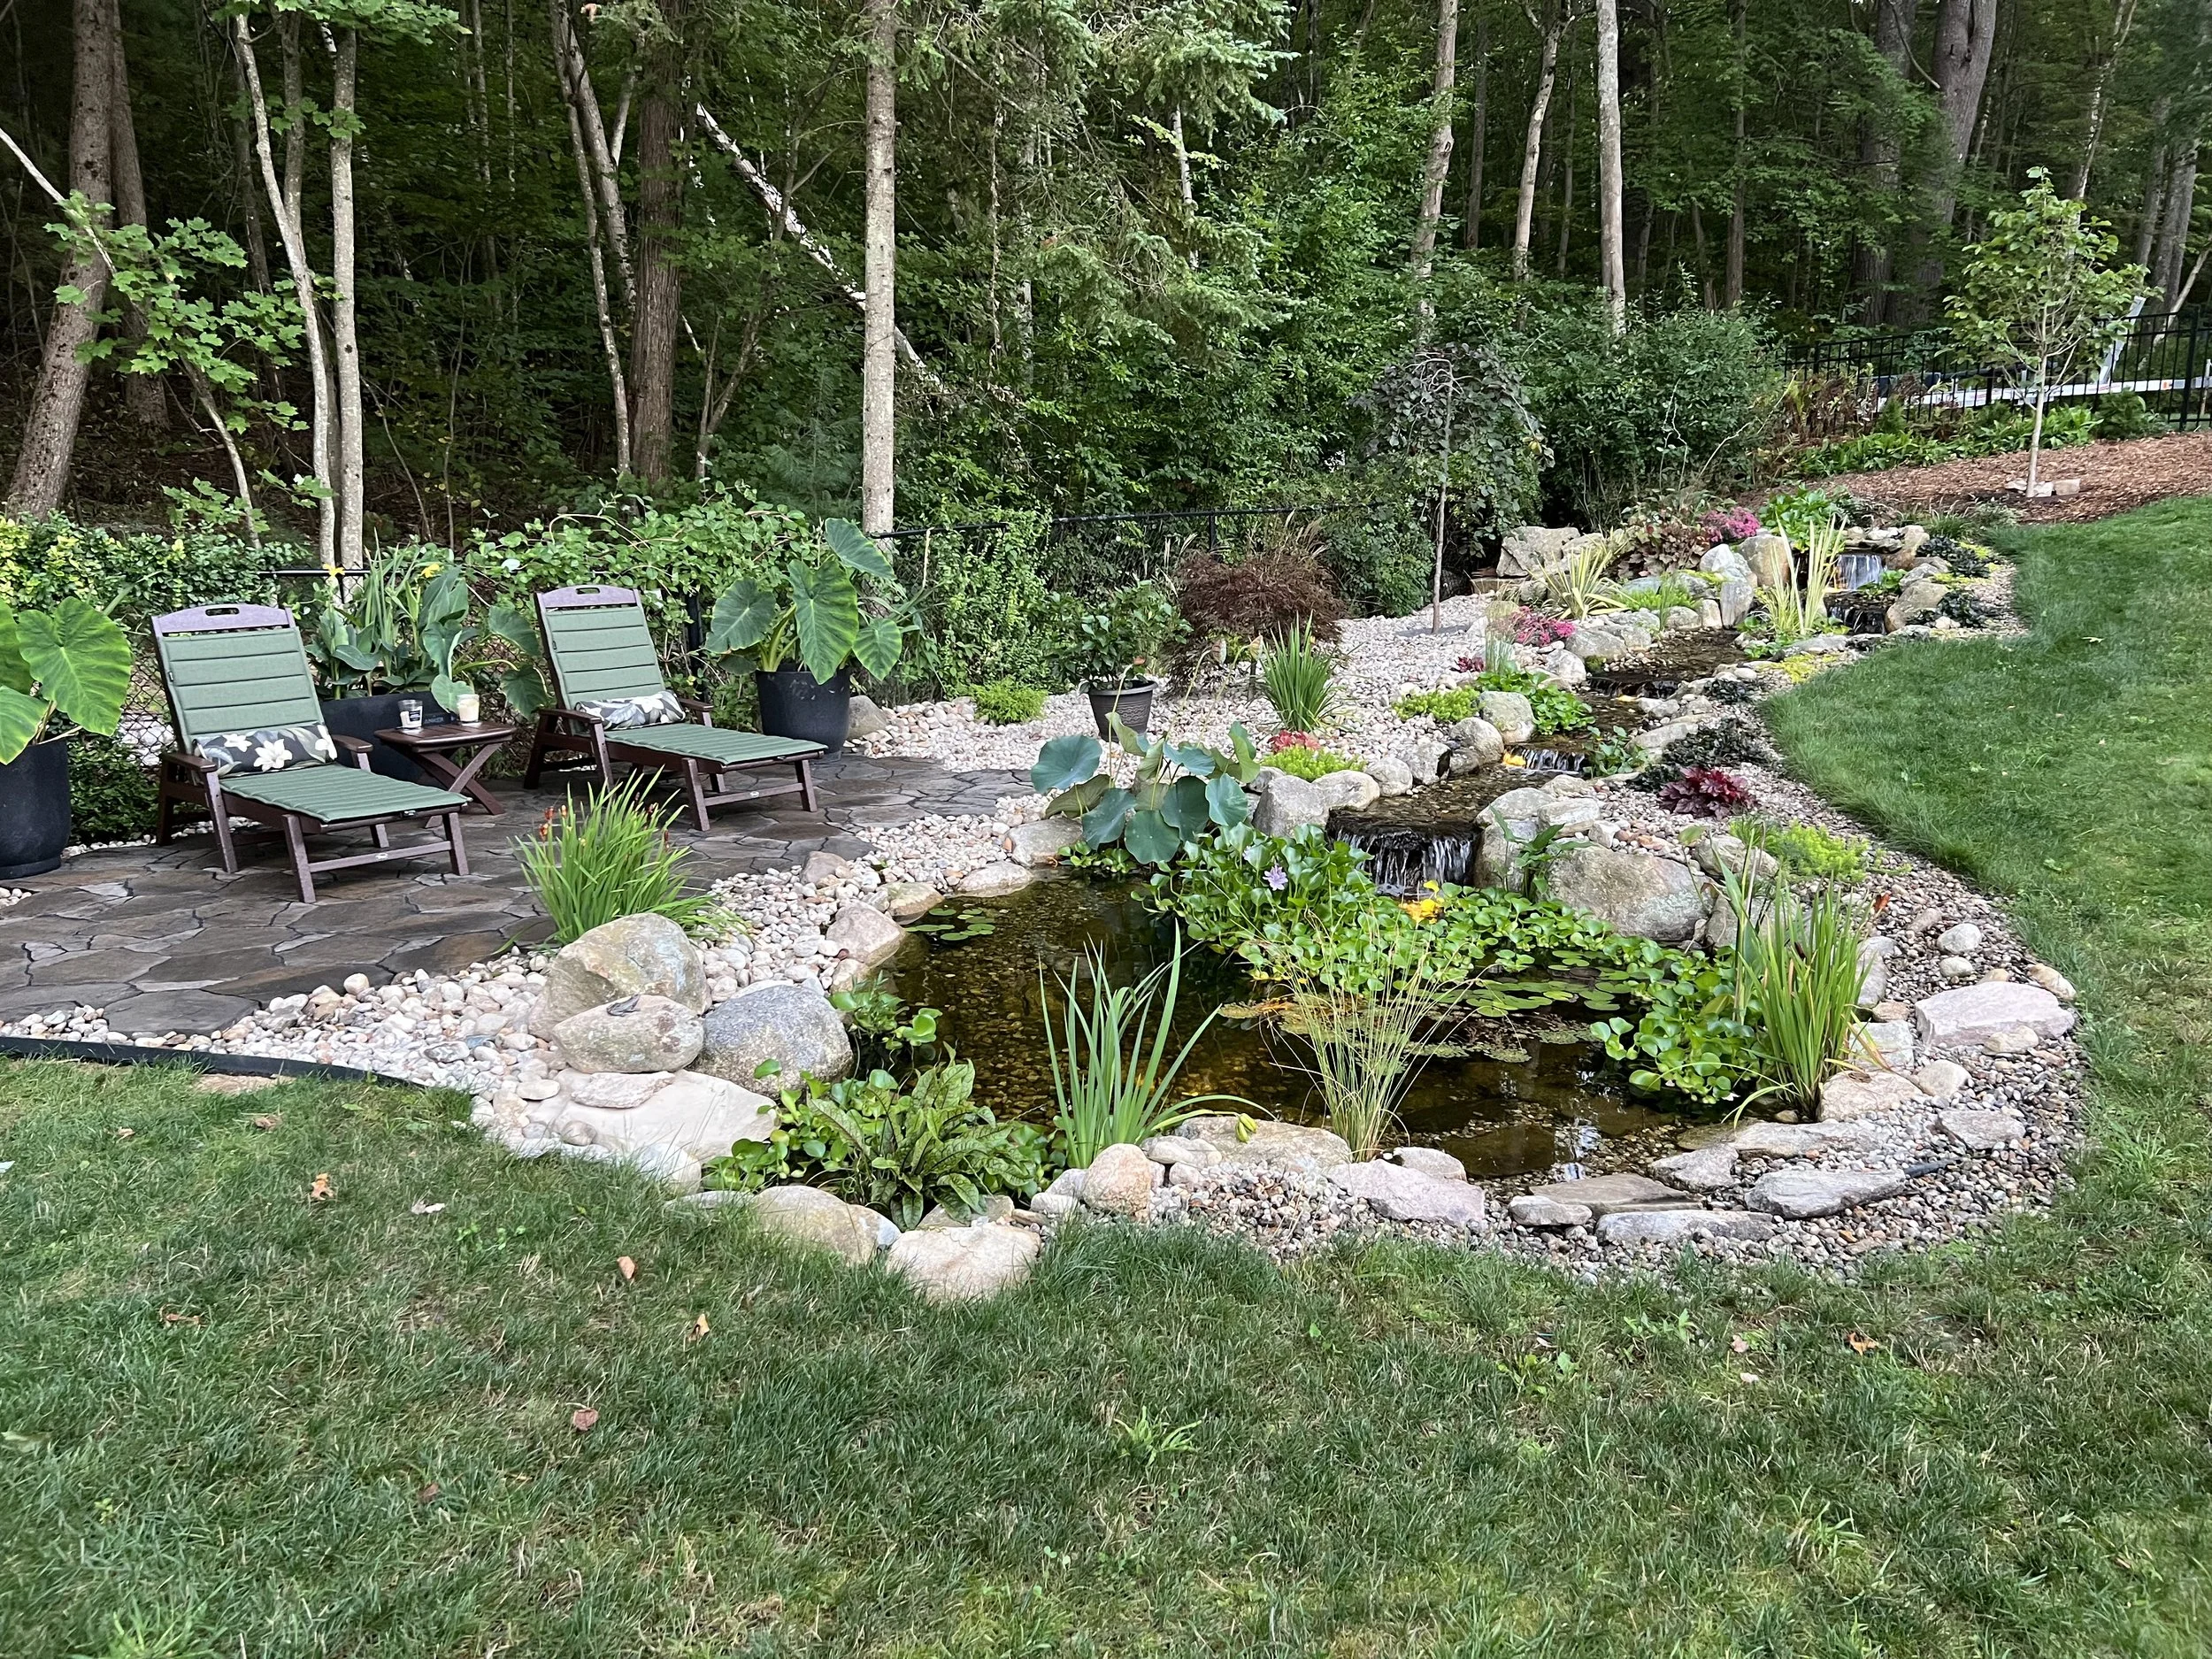
Pond Planting
Pond installation is complete, and Maddox wasted no time helping herself to the cool, fresh water.
The construction left behind lots of loose dirt, which easily combined with summer hurricane rains to make a giant muddy mess. Decaying organic material in the sediment mixed with air in the waterfall to cause foam, but that was short-lived as the ecosystem came into balance.


Plantings are starting to fill in, and the patio is taking shape.

Night falls and autumn leaves

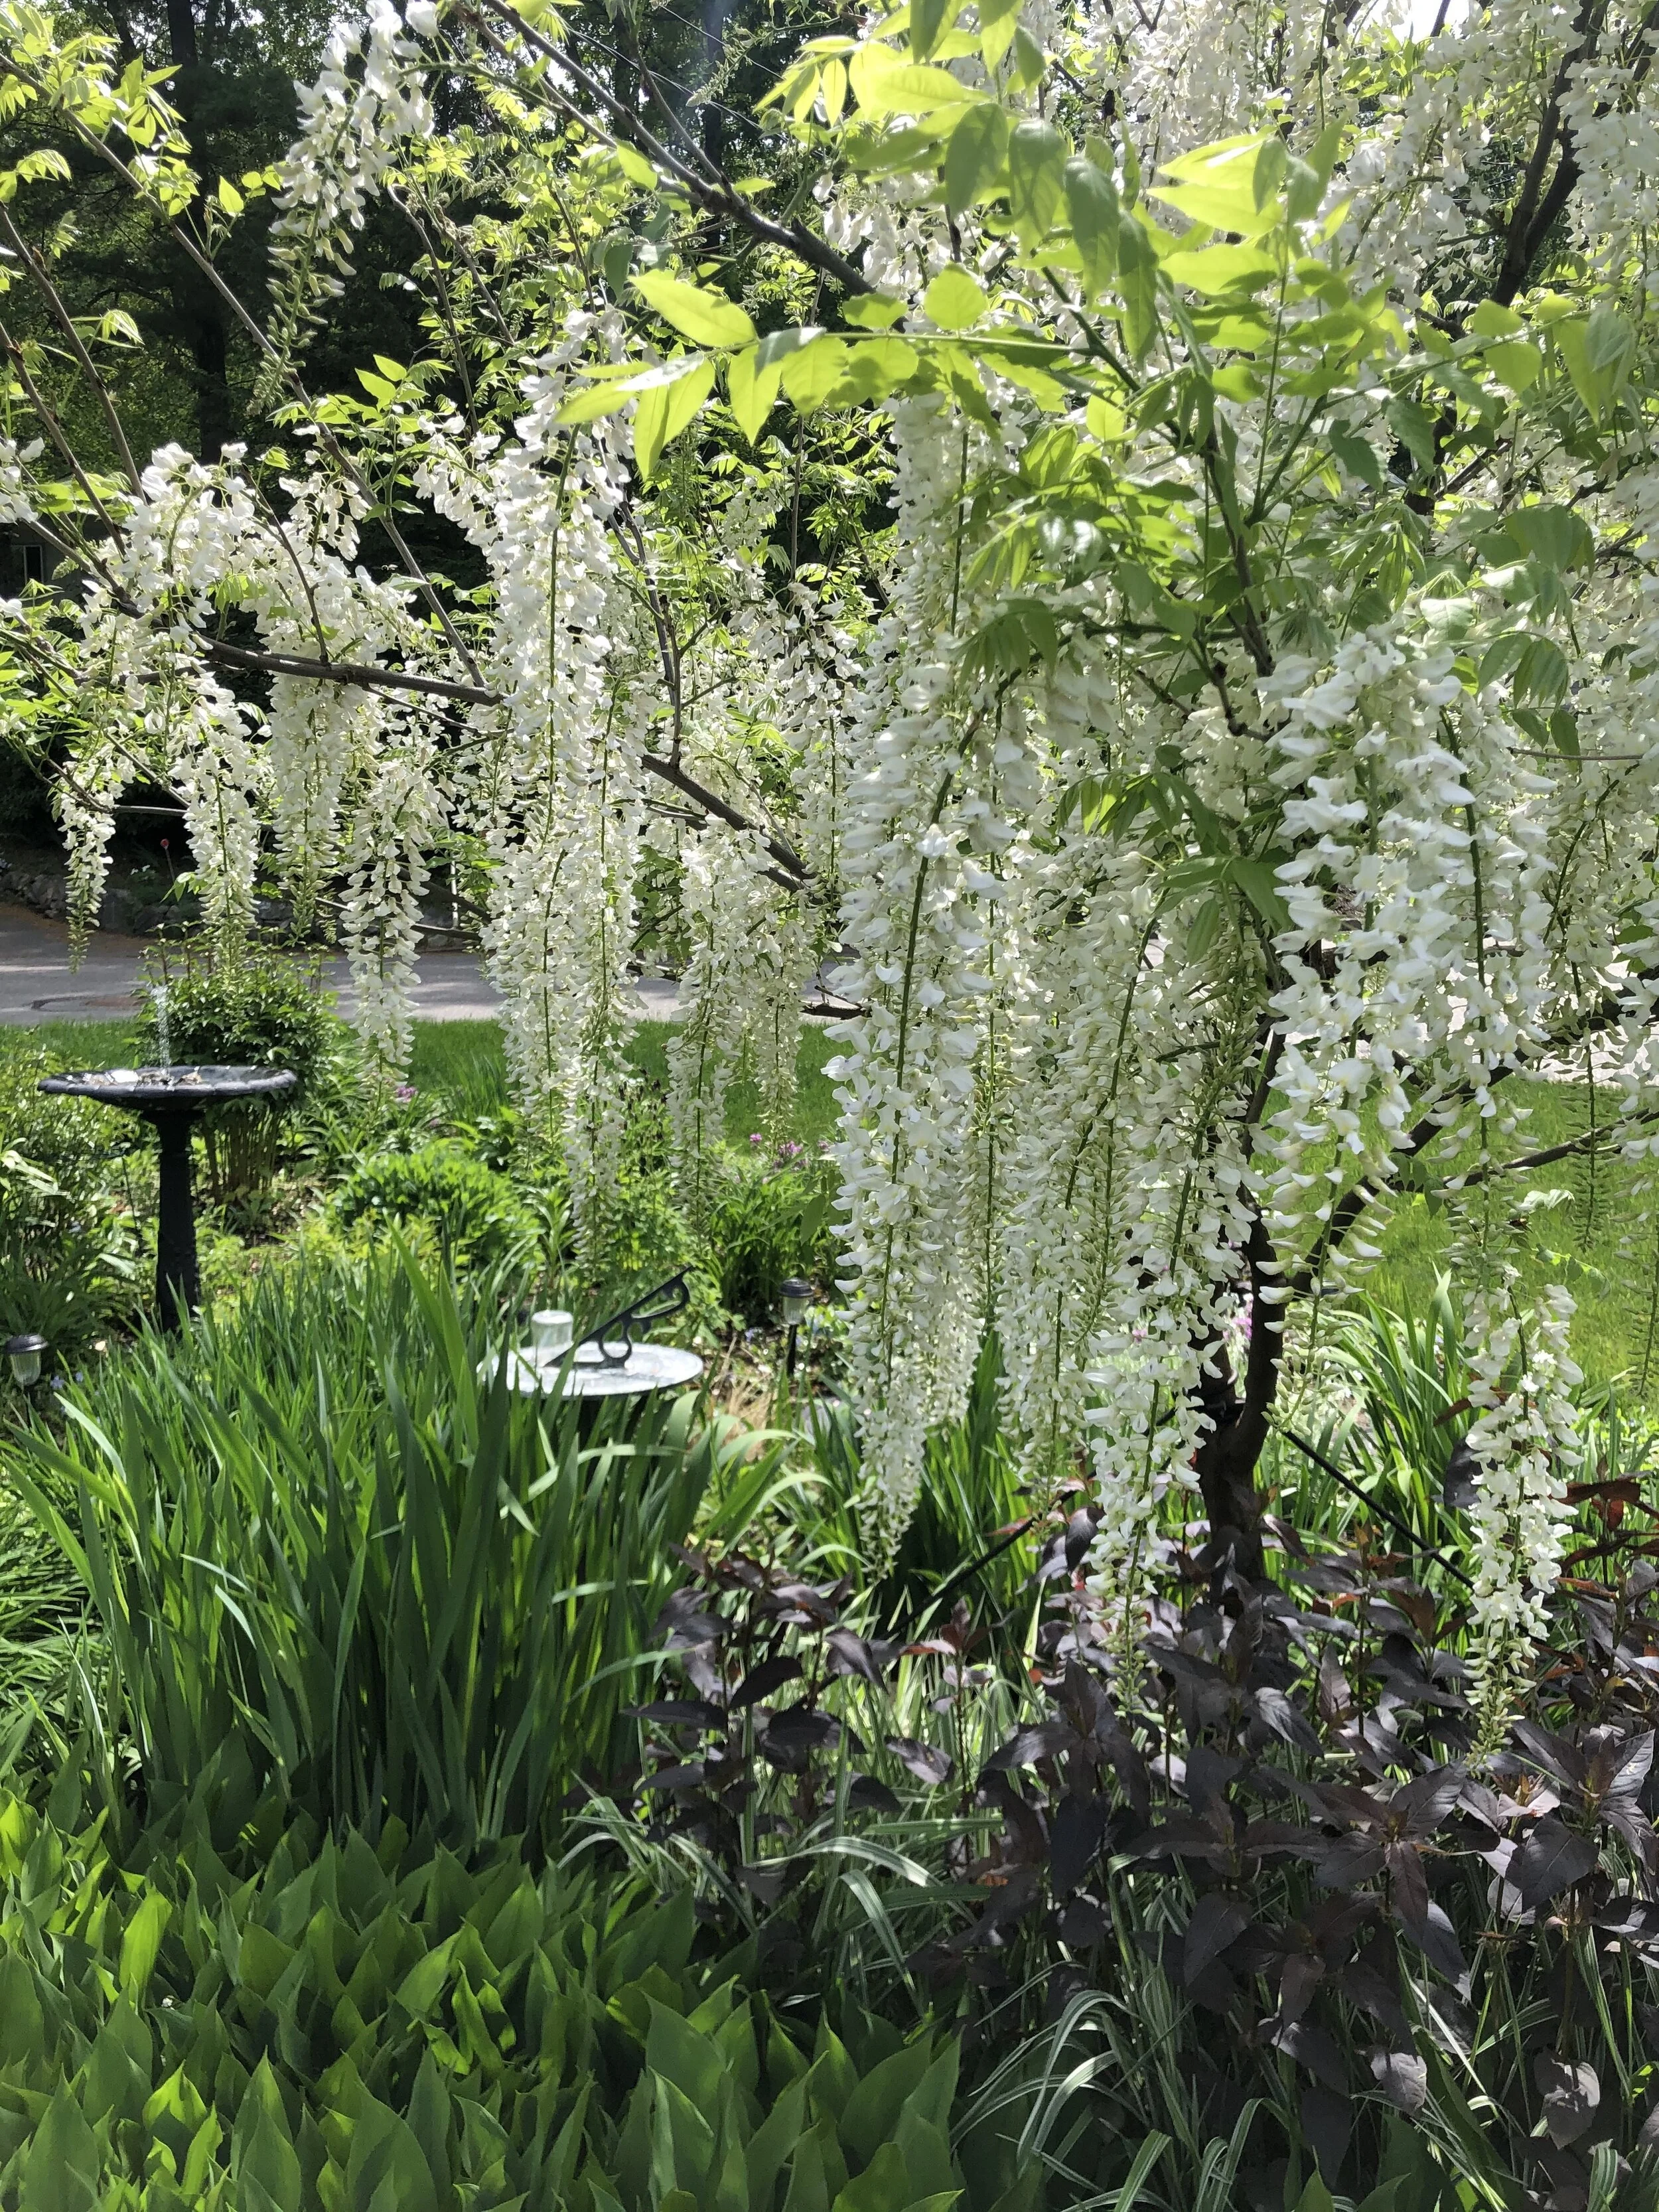
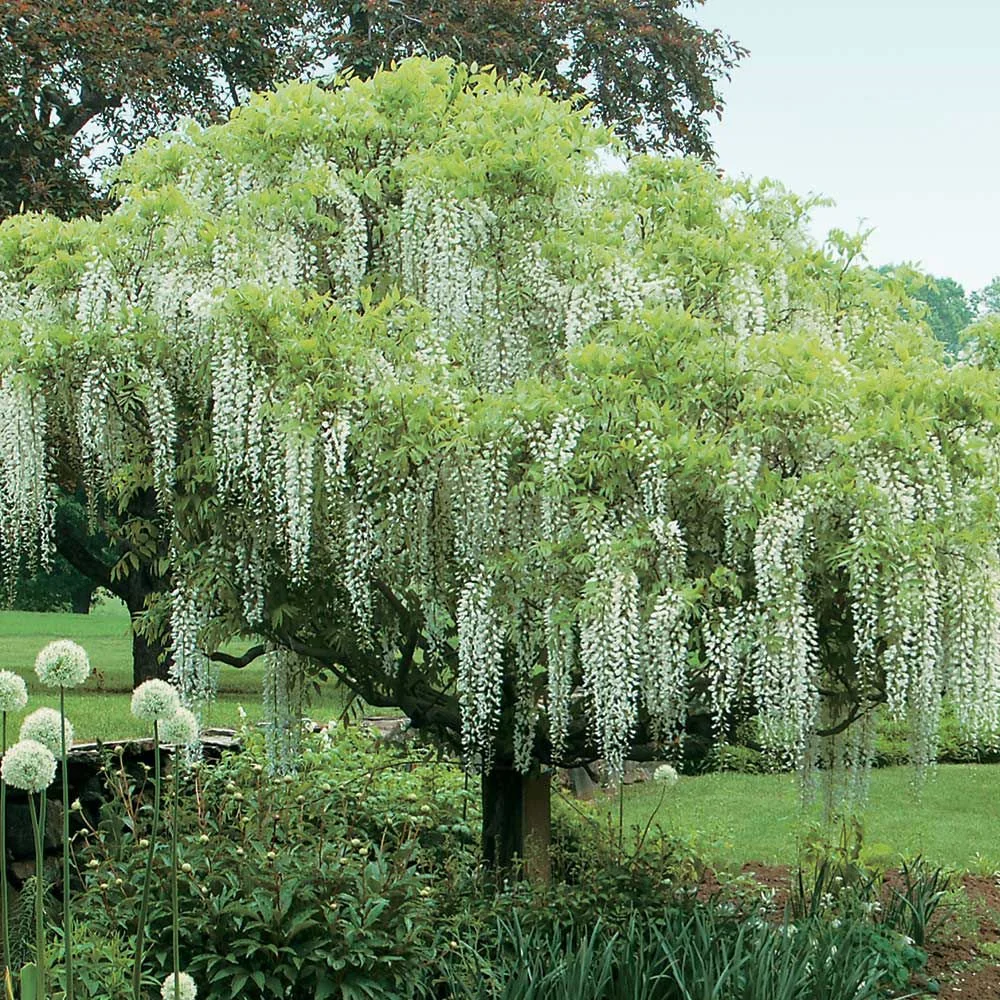
Wisteria Blooms
A spectacular show four years in the making.
I’m so pleased with this find… a tree-form wisteria with long elegant racemes of fragrant flowers. It’s taken a lot of patience and tender loving care, but the results are well worth it.


May 23, 2021: AMAZING!

Saving Wisteria
Aw, crud. Some little bugger stripped the bark off my wisteria tree… all the way around. GRRRR.
Being girdled will typically kill a tree, but I’m doing to try my best to save it. After some time on YouTube, I decided to insert several bridges with grafting paste, wrap the exposed area in moss, and then cover with loose-weave burlap for the winter. Now we wait.


Yard Attack
When you spend as much time in the yard as I do, it’s frustrating when your efforts are foiled by invaders.
Invader #1: Slugs. These guys target the hostas in my flower garden, and the basil in my herb garden. I’d heard the cup-of-beer trick, but since I didn’t have any skunky beer hanging around, I opted for my own brew with a recipe from The Art of Doing Stuff. I now keep a bottle of Slug Chug in the greenhouse and refresh the cups a couple times a week.

Invader #2: Lawn Fungus. Several lawns in the neighborhood have been affected. I’m not sure exactly what it is, but it turns the lawn a fairly vibrant shade of yellow. Just a few days after applying Scott’s DiseaseEx Lawn Fungicide at the curative rate, my strip of side yard seems to be going back to normal. At least it’s not bright yellow. Or spreading.

Invader #3: Rodents. I’m not sure which variety… moles or voles or chipmunks… but someone has been eating the bark off my wisteria tree. It has been completely girdled, which means certain death unless I can perform some surgical miracles. I’m attempting to learn how to graft a bridge that will allow nutrients to cross over the barkless area. I guess we’ll find out next spring if I’ve been successful.


Rain Chains
If the Pacific Northwest is known for rain, then it should also be known for rain chains. The flare for arts and metal sculpture makes Seattle the perfect place to turn drizzle into music. I’ve always loved the lotus-cup rain chains (below) on my aunt & uncle’s post-and-beam cabin in Sequim, Washington.

Sadie relaxes in the shade by the Sequim house.

Rain chain water collects in an anchor bowl.
My house has three downspouts across the front that I’ll replace with rain chains. I purchased four 8’ Ring Rain Chains, three gutter adapters, and three anchoring basins.

Overview of the house, with downspouts on each end and at the center.
I decided to start with the short end of the house. I had always thought the bank of forsythia made the garden look somewhat lopsided, so it was easy to part with the one on the end. (Plus, it looks great at Rosemary’s house! #WillWorkForPlants)
For drainage, I filled the hole first with large rocks, then with pea gravel that I had leftover from the greenhouse installation. Finally, I topped the hole with round decorative beach rocks and an anchor bowl. (Note: I later decided to drill holes in the bottom of the bowl to avoid the mosquito breeding ground.)

Digging out the forsythia.

Big rocks.

Pea gravel for drainage.

Decorative rocks and anchor bowl.

First rain chain done!

Inside the gutter.

Rain chain #2
Water pours easily down the chain in a deluge. (Sorry for the crappy through-the-screen pic… as you can see, it was raining outside!)
I expected a little splashing, and since my deep eaves put the gutters about two feet away from my house, I don’t have to worry too much about damage.

Heavy rain.

Roses & rock river.
Garden Tags
I like labeling my plants… mostly so I remember what I already planted when spring rolls around and I want to stick a shovel in the ground. Some of my perennials are late to pop to the surface, and others never pop up at all. Such is life in Zone 5.
The trouble with plant tags is that they’re generally white. Or yellow. They look like litter against the thawed-but-not-yet-sprouted garden dirt.
Enter SPRAY PAINT, my new favorite medium. Combined with a white acrylic marker pen, these tags look neat and camouflaged.


Glad Corner
Tall spears of gladiolus make this corner a haven for hummingbirds.
In my attempt to avoid weed-whacking, I carved out this inside corner of the fenced yard for my gladioli and dahlias. These tender perennials wouldn't survive my zone 5 winter, so I uplift the corms/tubers before the first frost and store them dried in the basement. As soon as the ground is soft enough to work in the spring, the whole corner gets tilled and prepped for re-planting.
An added bonus - the hummingbirds LOVE this corner!
Greenhouse Part 3: Gravel & Pavers & Gadgets
Now that the greenhouse is assembled, I'm anxious to get it decked out with good drainage flooring and other fun toys.
Now that the greenhouse is assembled (go see that post), I'm anxious to get it decked out with good drainage flooring and other fun toys.
I figured I'd need about a yard an a half of pea gravel, so of course I ordered two. And a pile of pavers. I've probably used less than half of the pea gravel... but I plan to use it outside the greenhouse as well, so I figured I'll see how far it goes and then top up the greenhouse floor with whatever I have left.

More bells & whistles...

Automatic vent openers

Fold-out potting bench with running water

Bushel basket from the local farm stand to hold all my veggies and herbs, plus suction cup hangers to stow my hat & apron.

Bins for potting soil, composted manure, seed-starting medium, and whatever else.

Wireless thermometer


Greenhouse Part 2: Assembly
Boxes of greenhouse parts have sat in my carport long enough… time to get building!
First, go read the previous greenhouse post.
My project started with needing to bump out the top shelf of the garden terrace. The top step was plenty big for my little 5' x 5' temporary greenhouse, but it needed to be a little wider to accommodate new the 6' x 8' footprint. Also, since the sandy slope was likely to erode if not properly stabilized, I lined it with plastic and stone dust to direct water out the edge rather than down slope.
Here's the base kit resting on top of the in-the-way rocks. Also, notice the spigot that I’d added when the irrigation system was installed… this will give me easy access to running water inside the greenhouse.

The earth anchor kit provides (10) 12" L-bolts that are sunken into concrete. Of these 10 anchors, I opted to put two of them into 24" deep cylinders. These are on the down-slope corners, specifically where the softened terraced earth might not be very stable. Since the greenhouse is exceptionally light, the anchors are more about keeping it from blowing away, and less about supporting it.
Here's the stainless steel base kit leveled, squared, and ready for concrete:
Day 1: Time for assembly! Start at the beginning... of the SIXTY-FOUR page assembly instructions. (Yeah, I was a little intimidated, but I wanted this pile of parts out of my carport.) My first day at this took about 6 hours. This included finding all the right parts (there are a LOT of parts), and learning all the tips and tricks of the kit. Plus a hundred water and subsequent potty breaks, since it's a million degrees out. But finally I had something that resembled the ends of a giant clear gingerbread house. I left these flat on the driveway overnight.


Day 2: Stand it up! The sides and roof went significantly faster... maybe because I had learned from all my Day 1 mistakes. Roof, sides, vent windows, gutters, sliding doors... all done in about 12 leisurely hours.

Assembly complete! I still have some finishing touches... the downspout kit, the automatic vent openers (they're cooling off in my fridge to retract the piston)... but it's pretty much assembled.


Now ready for a floor. The plan is to do pea gravel and pavers... but that's going to need to wait until next weekend. (Go see!)

Greenhouse
Time to get my grow on.
Time for a greenhouse! I have been talking about getting one for years, and I even bought the 5x5 Ocean State Job Lot deal last year as a proof-of-concept. (You can see it at the top of the terraced vegetable garden.) I love it. I love that I can go in there in the middle of winter and smell dirt. I can store all my different kinds of soil and compost and peat. I have a remote weather sensor inside, so I can see that on a sunny day when the deck temperature is 30, the greenhouse is 65. Love love love it.
So, yesterday I ordered the real deal. I chose the Grandio Element 6x8 Aluminum Greenhouse. I opted for the premium package, which includes:
- Earth anchor kit - creates a foundation for the greenhouse to be installed right on the ground.
- Steel base kit - Securely mount your greenhouse with one of our all-steel base kits.
- Plant hangers
- Automatic roof vent openers (2)
- Trellising kit
- Drip irrigation watering kit
- 8-oz panel cleaning kit
- Four frame-to-base brackets
Here's the catalog pic... mine will be mounted on the ground.
Then I also tacked on:
- Snow Load Kit
- Moisture Control Kit - prevent insects, dirt, mold and algae from entering the channels of your twin wall polycarbonate panels.
- Shade net
- Drain downspout kit
- Slatted Potting bench (2)
- Solid Staging table

Now it's sitting in the carport... a big pile of pieces and an assembly guide thicker than your average magazine. I'm a little intimidated.
That will be for a later post... go take a look!

18 Bags of Poop
A big steaming load for my new flower garden.
Well, manure. I loaded up the front garden with dark black yummy compost soil, rather than more mulch. It already has too much wood debris from the stump grinding... I figured this would be better for the plants. Now I should probably Preen the crap out of it.
Before
After
Wisteria
Adorning my front garden with the lovely and fragrant wisteria.
The catalog image... but of course, it doesn't look like this when it arrives.
I wanted to punch up my front garden bed... a small showy tree with fragrant flowers. Our neighborhood has plenty of lovely magnolia, cherry, and dogwood trees... I wanted something unique. Enter: Wisteria Longissima Alba Tree Form.
A few weeks later, I found myself planting what looked like a dead stick. (Am I being punked? Hey... look at the neighbor watering her pet stick!)
But sure enough, signs of life emerged, and now I have a fuzzy green tree living in my front garden.

My baby tree has arrived. (01-JUN-2017)

Dormant, not dead... so they tell me.

Signs of life! (24-JUN-2017)

One month after planting. (01-JUL-2017)
UPDATE: Crazy thing still doesn’t look like the catalog picture, but it is healthy and happy. Reminds me of a Chihuly sculpture. Sometimes it blows over in a harsh wind storm… not pulling the roots out, but just bending because the trunk is so flexible. I gave it a bigger stake and some tie-outs, and it seems to be staying put now. The rest of the garden is growing in nicely, too! (12-SEPT-2019)

UPDATE: First buds have appeared! I’m excited to see it bloom. (21-MAY-2020)


Garden Irrigation
Installing drip irrigation in the garden was like playing with Legos for grown-ups.
Doesn't this look like something you'd buy at Toys R Us? I'm totally into it. Each of my garden beds is now equipped with a series of small drippers to keep my plants hydrated without soaking the leaves. For now it's on a battery-operated timer, but when I install an irrigation system in the yard, this will tie into it and be its own zone.


18 Trees
More sun, fewer acorns, and less scraggly dead junk.
I'm biting the bullet and having trees removed. EIGHTEEN trees. And the thing is... this won't even make a dent in the forested sanctuary of my back yard. The biggest difference will be to the front yard, where 4 out of the 5 trees will be removed.
I feel somewhat guilty about the oak... it is a nice tree. At least, it's nice until early November, when I start to curse its name. The leaves of my maples fall politely all at once, and I dedicate one afternoon to mulching them for my garden beds. The leaves on the oak, on the other hand, start falling around Halloween and continue to fall until March. And then there's all the other droppings... the tree is always pooping sticks onto my yard. It's also decorated with widow-makers: giant broken limbs hanging 60 feet up, just waiting for the perfect storm to knock them loose.
And then there's the ACORNS. Millions of them. The yard becomes like the ball pit at Ikea, if the balls were marbles with tiny sharp prongs that stab the bottoms of bare feet. I swear the squirrels throw them with force... my bedroom is a percussion instrument. I *!@%$* hate acorns.

Giant oak and three dying firs... these are on my top-ten list of trees to remove.
Then there are the scraggly ugly trees in the back yard that are irritating to mow around and add no beauty. There are a few crowded fir trees that are becoming weak and attracting carpenter ants... they're dead vertical fire starters. A couple others have made sport of dropping onto my fence.


Above: One of the black birches in a small stand decided to let go one winter storm. Just as well, since I keep having to rip out the root-runner babies.
Left: A storm in December 2014 snapped this leaning maple in half. I'm not sad to see them go, since its brother is bigger, and leaning farther onto my property. It worried me that someday they'd hurt more than just the fence.

Sadie surveys the wreckage.

Loam spread in the front yard.
The yard before, with 14 trees scheduled to be removed.
The yard after, with plenty of trees left.

Front Walk Garden
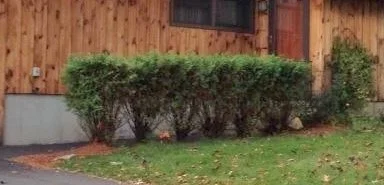
The arborvitae hedges smelled nice, but had grown beyond an attractive shape. I initially tried to prune them back, hoping the woody lower half would fill in. It didn't. So out they went.


Finally I decided that I didn’t really want a row of matching, unappealing hedges. I picked new plantings that will hopefully give the area more interest all year long.
- Dwarf Alberta spruce
- Oenothera 'Siskiyou Pink'
- Salvia
- Missouri Primrose
- Spirea
- Butterfly bush
- Hydrangea


Update December 2016: My little spruce is adorable dressed up for Christmas.
Update Summer 2017: a few plants didn’t survive the winter, but for the most part, my plants are thriving. I love the variety of heights and textures and colors and flowers. The scent of flowers and a flutter of butterflies greets me every time I walk out the door.

Terraced Vegetable Garden
Screen room gone, and replaced with a terraced vegetable garden built with rocks.
When the screen room came down, the scarred footprint was a nasty mix of litter, construction debris, and sand. First I cleaned the garbage and dug out the top foot of dead soil to roughly outline the steps.


Next I used local rocks (boulders, technically) to build steps. This is the granite state, after all... and I had lots of neighbors willing to contribute their rock piles. I experimented with shapes... fitting rocks together and carving into the slope. I didn't want a symmetrical staircase... I wanted something a little more natural feeling.


The sand is so loose that I used plywood pieces to hold back the steps... I'll need to find a more permanent solution, but this works for now. I also learned in the first heavy rain that the sand easily poured through the gaps between the rocks, leaving little deltas on the next level down. Learning from my neighbor Michele's garden success, I tore apart what I had already built, dug a ditch behind each rock wall and sunk a double layer of heavy plastic sheeting to keep the soil where I wanted it.

That's as far as I got in the summer of 2016, which is just as well, since I wasn't about to plant new vegetables in August. My boulder-hoisting continued in spring 2017:


Once I got the step the way I wanted it, I filled each bed with manure-rich organic garden soil and started planting. Happy garden!

Rain Barrel
My hand-me-down rain barrel now collects rain from two segments of gutters, and sends overflow through tubes buried in the garden. At least... that's how it works when it's not overflowing from summer deluges.

